|
If you are doing any exterior designs for your home then the best way you can use is aluminum siding. Aluminum siding is a cost-effective method that helps you when you are thinking of home decorating. And also it is an easy and quick way to do it on yourself. There are different styles in your aluminum siding that you can choose. It may be of weatherproof, waterproof, protection, etc. As the aluminum metal is reliable material to work it has many advantages. The main advantages that you find in this section are, it is more durable, it is of low cost, it can be customized easily. So how to cut aluminum siding. How To Cut Aluminum Siding – Step By Step GuideTotal Time: 1 Hour Step 1: Prepare With The Basic ToolsThe main and the first step that you should do for cutting the aluminum siding is making sure that you should have all the tools that have been mentioned in the article. Take your time to set up the different and required types of equipment you need and be ready with the safety measures. Before starting your work set yourself by the gloves and goggles. As it will give you the protection. While you are cutting the aluminum siding be sure that you are using the panel. Step 2: Making The MeasurementsIf you want the precise results then your measurements should also be precise. So the next method is taking the measurements. If there is a small change in taking the measurements then your work may become poor and unsatisfied for you. So make all the measurements using the tape and mark precisely. So be sure of taking the measurements. Step 3: Cutting Aluminum SidingThe third step is cutting the width. After you are done with the precise measurements, take the siding to your workplace, it may be your garage, any home area, can also be lawn in your home. And start to cut the width. Use the tin snips for the countered lines. If you are doing curved cuts then don’t use the nibbler. But you can use those nibbler to use it on the long horizontal cuts. Step 4: Using The Tin SnipsSome of the aluminum siding cuts will be different from the straight cuts that you make using the circular saw or the miter saw. These different types of cuts are not easily done using the circular saw or the miter saw. So you have to use the tin snips which makes your work easier. So the next step is using the tin snips. This is for making precise cuts. There are three kinds of tin snips. One is the green tin snip. This green tin snip is for the right side cutting users and the straight cuts. The second kind is the yellow tin snip. Yellow tin snip is for the straight and wide cuts. The third kind of snip is a red tin snip. It is for the straight and left side user cuts. Majorly the yellow tin snips are not used while cutting the aluminum siding. These tin snips are also used when you are trimming. And even in cases like if you want to trim a section while you are using the saw, then you can use these tin snips. Step 5: The Long CutsIf you need any horizontal cut then use the miter saw or the chop saw. You can use a miter saw or radial arm saw also. While using the saw be sure that you are cutting slowly. Along with the safety precautions like goggles for your eyes and gloves for your hands. Then place the aluminum siding around the windows and the doors. And start cutting horizontally from the top of the aluminum siding. It will give you a clean and professional cut. It’s better to use the power saw when the place of cutting is wide. And using a tin snip is better if the area is thin. Step 6: Checking The AccuracyThe final step is checking the accuracy. Make a check that you have cut very precisely. And also be sure that the edges are smooth and good. If not try to smooth the edge using the required tools for that. After this, you are completely done with your aluminum siding to your home décor. Things You Would Need To Cut The Aluminum SidingThe basic materials that you need for cutting the aluminum siding are,
These are the materials you need for cutting the aluminum siding. I know you may be confused about buying the products. So below there is a list of best products from amazon.com. I hope this helps you to buy the best products for your work. 1. Porter-Cable Chop Saw
Sale

Porter-Cable Chop Saw
2. Craftsman CMHT73756 Metal Snips
Sale

Craftsman CMHT73756 Metal Snips
3. DeWalt DWS779 Miter Saw
Sale
DeWalt DWS779 Miter Saw
4. Crescent Wiss Metal Snips
Sale

Crescent Wiss Metal Snips
5. Makita JN1601 Nibbler
Makita JN1601 Nibbler
Some Tips
FAQs1. Which is the best tool for cutting the aluminum siding?The miter saw or the tin snips are used for cutting the aluminum siding. 2. Can we use the circular saw to cut the aluminum siding?No, you cannot use the circular saw to cut the aluminum siding because it damages your aluminum siding. 3. Can we use a wood blade for cutting the aluminum siding?Yes, we can use the wood blade for cutting the aluminum siding, but you have to choose the right blades. 4. Can we use the jigsaw for cutting the aluminum siding?Yes, we can use the jigsaw for cutting the aluminum siding. But you have to use the right metal cutting blade with the jigsaw as it gives smooth and accurate cuts. 5. Which tin snips are usually used in cutting the aluminum siding?While cutting the aluminum siding usually workers use green tin snips or red tin snips. Final ThoughtsDecorating your home without more cost is done by the aluminum siding. So if you know how to cut the aluminum siding, and you can do it on your own then it very precious work. Cutting the aluminum siding is not so easy if you don’t know how to cut. At first, you might feel it as difficult. But now you know the steps about cutting the aluminum siding. This will help you to make easy cuts using the snips. Once you are done completely with learning the cutting of the aluminum siding you can easily do any DIY projects. source http://thehemloft.com/how-to-cut-aluminum-siding/ Via https://thehemloft.tumblr.com/post/636368042430955520
0 Comments
Downspouts are very necessary for collecting rainwater. They help in keeping the rainwater away from your foundation so that it doesn’t erode the soil around your foundation. Cutting a downspout is not something you’d come across every day. Fortunately, it is effortless to cut a downspout. Here we will show you How to cut downspout. How To Cut A Downspout – Step By Step GuideTotal Time: 1 Hour Step 1: MeasuringThe first step should be taking the measurements for your project. Measure the height from top to the bottom of the downspout. In case you replacing the downspout with a new one, you can measure it for perfect measurements. Be very sure of the measurements before you mark them and start cutting. Step 2: Mark The MeasurementsOnce you have taken the measurements, you need to mark them on both the side of your downspout. Use your carpenter’s pencil for this purpose. On one side of your downspout, you need to hook the tape measurements so that you can stretch it down to the other end. Once it’s stretched out to the required level, mark the measurements. Make one more mark 2 inches longer than the first. The third mark needs to be 2 inches shorter than the first mark. Once you are done with it, you need to repeat these marks on the other side of your downspout. Step 3: Bring It In PositionOnce you are done marking the lengths. Lay your downspout down on a flat surface. The surface should have proper clearance for cutting the downspout. You can use a workbench and clams if you need extra stability. Step 4: Take All PrecautionsWorking with any power tool requires all the precautions you can take. Don’t wear loose clothes, dangling jewelry that can get stuck in the tools while operating them. Wear ear and eye protection. Make sure that you wear gloves, and hearing protection is the most important. You can wear long sleeves T-shirt while working. 5) Cutting it A. Steps to cut it with a Jigsaw: B. Steps to cut it with Tin Snips: C. Steps to cut it with a Hacksaw: Step 6: Crimping The DownspoutA crimping tool will ensure that your downspout fits perfectly inside the elbow. It will crush or deform the end part of the downspout if you try fitting it without a crimping tool. Just crimp both the corners of your downspout with this tool. And you will create an end which fits perfectly inside the elbow. The Things You Would Need To Cut A DownspoutYou require the following things to cut a downspout:-
FAQs1. Which Tool Can Be Used To Cut Gutters?You can use a hacksaw and aviation snips. You can also use a sharpened 12-inch power miter saw with a carbide- tupped finish blade to cut gutters. 2. How expensive is it to replace a downspout?The total cost varies between $1,500 to $2000 per job. Repairing costs around $5 to $10 per installation. Also, it costs $100 to remove and dispose of faulty downspouts. 3. Which is the best extension for a downspout?Genova AT575 Spout Extensions and Amerimax Home-Products ” Downspout Extension. They are two of the best extensions for a downspout. 4. What is a downspout used for?It is used for collecting rainwater. It carries it from the roof and directing it from the foundation. It prevents flooding in the basement on a rainy day. 5. How often can someone put a downspout?There should be at least one downspout present within every 40 linear feet of gutter. 6. Can a downspout be buried?Yes, it is fine to bury a downspout. This will give you a neater look. You can hire a professional to bury it. Final ThoughtsDownspouts are great for channeling the rainwater away from your foundation. Most DIYers never even cut a downspout. You are not alone in this. It is not a difficult job. If you follow the steps given in this article, I am sure you will be a pro in no time. If you own a jigsaw, you should use it to cut your downspout. It provides you with the most accurate output. Using tin snips is good if you don’t own a jigsaw. They don’t give a very finished output, but the jagged edges always end up being inside the elbow. So, if you don’t have a jigsaw, tin snips are a great option. You can even use a hacksaw, but you will have to be very attentive and cautious while cutting, significantly while cutting the last strokes because everything will be a mess if they go wrong. A crimping tool will be of great help while inserting the downspout inside the elbow. You can work without a crimping tool as well, but the result will be compromised. Hence, cutting a downspout is an effortless job to master. source http://thehemloft.com/how-to-cut-a-downspout/ Via https://thehemloft.tumblr.com/post/636364486823084032 Many times we throw away a perfectly good gadget because of some issues with the wire. Most of us do not know how to cut the wire or which tool we should use to cut wires. So today we are here with this article to tell you about how to cut wires. So, read on to gather the full information about how to cut wire. How To Cut Wire – Step By Step GuideCutting of wires is quite an easy process if you have any prior experience or knowledge. Here we have divided the entire process of cutting wire into three parts. Each part is equally important and is further divided into steps to help you understand the procedure more clearly. Part 1: Choosing A ToolIn the first part of the process, we need to choose an appropriate tool for cutting the wire. There is more than one tool that you can use for this purpose. So, read on to understand how and what to choose from the available options. Total Time: 45 Minutes Step 1: Lineman’s PliersFirst of all, we will tell you about the Lineman’s pliers. Lineman’s Pliers are also commonly known as the Side Cutting Pliers. The Lineman’s Pliers are a simple tool used to cut wires. These have a cutting device attached at its sides. It is one of the most commonly used tools in the field of construction or electrical works. Lineman’s pliers are a very popular choice for cutting electrical wires because these are very easy and safe to use. It is quite comfortable to work with because it has ample space to hold it firmly while cutting. Step 2: Long Nose PliersNow the selection of tools for cutting wires is based on the type of wire you are cutting. Different types of wires require different types of tools. For example: If the wire you need to cut is a small gauged wire, then you should go with a Long Nose Pliers. Why? You ask! Well, it is so because the Long Nose Pliers are designed to cut the small gauged wire specifically. As the name suggests, Long Nose Pliers have a pointed nose like the end. The pointed end of the pliers is very thin and sharp, which makes it simple for you to place it on the small gauged wire and cut it easily. There are different types of Long Nose Pliers. Some have straight ends while some have bent ends. It is ideal to use these pliers if you are cutting wire of about 8 to 24 gauge. Due to their slim and long nose, the Long Nose Pliers also come in handy in connecting wires together. It will be of special help to you if you are working on delicate wires related to jewelry or guitar strings etc. Step 3: Diagonal Cutting PliersAlthough it is always good to have a multipurpose tool with you, a multipurpose wire cutting tool can help you in almost all types of wire cutting situations. One such life-saving wire cutter is the Diagonal Cutting Pliers. These are standard and all-purpose tools. The Diagonal Cutting Pliers have a sharp and round tip. These tips help them in cutting wires. The Diagonal Cutting Pliers are suitable for wires of different sizes and thicknesses. Step 4: End Cutting PliersAnother valid option for you to cut wire is End Cutting Plier. This will help you in making super fine and close cuts. These generally have small tips. The tips help in trimming wires. If you are in a situation where there is not enough wire exposed to cut, then you can use these. Step 5: Do Not Use ScissorsWhile you have a plethora of options to choose from, you must remember that you should never use scissors to cut wire. Using scissors or blades can damage the wire, and you may not get a very clean and fine cut. It is also advisable to avoid scissors and blades for your safety reasons. These tools are not designed to cut wire; hence it may slip off your hand or injure you in the process. Part 2: PreparationStep 1: Safety MeasuresThe first step of preparation is to ensure your safety. It is highly recommended to wear safety goggles to protect your eyes from the pieces that fly out of the wire while cutting. The material that coats the wire can fly up and damage your eyes while cutting. Moreover, you should also wear gloves to protect your fingers. Step 2: Arranging The WorkspaceAs you have safely secured yourself, now it is time to arrange the place where you are going to perform the job. So first of all, take the wire you want to cut and properly place it on the surface where you are going to work. Make sure that the surface is even and flat. You should use a table or a countertop for keeping the wire. Also, keep in mind that you need to stand on a flat surface because if you are not standing steadily, then you might get hurt while cutting the wire by losing balance or tripping. Step 3: Securing The WireIf you are working with the wires within an electrical circuit or switchboard, you must make sure that the main power is off even before touching the wires. Ensure to cut off the power before you try to cut the wire. Even if you are repairing the wires of some gadget or any object, make sure to switch off its power button and unplug the device from any power outlet or remove the battery before starting the procedure. It is very important because if ignored, this mistake may prove to be fatal. Part 3: CuttingNow that you have secured yourself and your working space, you can now move on to the final part of the procedure, that is, cutting. Follow the steps listed below to cut a wire properly. Step 1: Upgrading The ToolNow that you are all geared up and ready, let us start the cutting. It is very important to understand that for cutting wire, your tools should be in good condition. To make sure that your tools can do the job, check for the sharpness of the blades beforehand. Also, make sure that the tools are clean. It is advisable to wipe your tools with a clean and dry piece of cloth before using it. You can also apply a few drops of oil to make them smooth. You must be thinking, why are we telling you such basic things? Well, we are reminding you of these points so that you know that cutting wire is a delicate work that needs precision. If your tool is blunt or rusted or is not working smoothly, then you might not be able to get the desired result after cutting the wire. The wire may get damaged or get cut unevenly. Step 2: Holding The ToolNow hold the tool properly in your hands. Make sure that you have a strong and comfortable grip on the handles of the tool. You should hold the pliers in your dominant hand so that you have full control over the tool. Also, remember to apply firm and constant pressure on the tool while cutting. Step 3: Placing the WireOpen the handle of the tool and place the wire in between the blades properly. You should keep the wire in such a manner that the exact spot that you want to cut is at the inner section of the blades of the tool. The center of the cutting spot should be held by the tip of the tool to provide maximum pressure on it. Step 4: Adjusting The AngleIt is imperative to adjust the wire and tool at a correct angle. For example, It is always advisable to cut the wire at a right angle. If you cut the wire at a right angle, that is, 90°, then the wire will not be damaged. Moreover, it is essential to maintain the right angle between the blades of the tool and the wire because it helps us to secure a clean and precise cut. On the other hand, if you do not maintain the right angle while cutting the wire, then it might get damaged and become useless. Step 5: Applying ForceYou should apply the force on the handles of the tool. If the force is not adequate, you will not be able to cut the wire. If the force id is more than required, then the wire will get ruptured. So, it is important to understand the amount of force that we need. The pressure should be gentle and steady. Let the tool do its job. Do not put in the extra effort. Things You Need To Cut WireTools:
End Cutting Pliers:
Table Countertop:
Final ThoughtsCutting wires is an everyday affair. Anyone can face a wire-related emergency at any time. But now you do not have to be tense about it. With the right guidance and accurate knowledge, you can perform this job with ease and precision. So, follow the step by step guide and learn to cut wire easily in no time. source http://thehemloft.com/how-to-cut-wire/ Via https://thehemloft.tumblr.com/post/636364485990514688 A chain-link fence is an essential item in almost all houses. Useful as it is, but it is quite tricky to install these fences, especially for a newbie. Although the process is not so complicated, the main problem arises when you need to cut the fence. It is necessary to cut the fence according to the size you need for it to fit the area you are planning to use it. But don’t worry, in this article, you will learn how to cut a chain link fence properly. How To Cut A Chain Link Fence – Step By Step GuideProcess 1There is more than one way of cutting a chain-link fence. We are going to present some of the simple procedures here. Each has its own merits and is easy enough for anyone to master. Total Time: 1 Hour Step 1: MeasurementsBefore jump-starting the snipping and cutting, you need to take the measurements. Measuring the fence will let you understand how much of it do you need. It will also make you aware of the portion you need to cut. It is advisable to mark the appropriate spots with a marker. The marked spots will give you a fair idea while cutting. However, you do not need to be very precise while cutting the fence, but still, overall accuracy is required. Step 2: Tension Bar And Fence StretcherOnce you have taken the measurements, you need to move forward to the next step. In the next step, you will need a tension bar and a fence stretcher. The tension bar is required to make sure that the tension is evenly distributed throughout the fence. It helps in straightening the fence properly. You should make sure to use it before cutting the fence. The end parts of the tension bar are called the fence stretchers. The reason behind using the tension bar and fence stretcher is to maintain the tension in the fence while cutting it. It helps in cutting the exact amount we require. Step 3: UnweavingNow let us move forward to the third step of the process: the unweaving. In this step, you will require lineman’s pliers. As the name suggests, you need to unweave the fence with the help of the pliers. You need to twist the bottom and top weaves of the fence. You should continue this process till one of the chain links are broken. This will lead to the freeing of that chain link piece. Now, if you are done with the unweaving, you should reinstall the fence stretcher. Put the fence on it and properly fix it in the required area. Tip: You should not throw away the leftover part of the fence. This may prove to be useful in many ways, and you can also use it to repair the damaged fence area in the future. Process 2Step 1: Bolt CuttingThe first process is quite helpful and useful, but that is not enough in some cases. So you need to be ready. In the second process, we are going to talk about the bolt cutting. As is clear from the name, you need to have a pair of bolt cutters for this purpose. You need to take the measurements accurately. After measuring the fence, you need to determine the positions where you want the fence to be cut. Once you are sure about the measurements as well as positions, it is time to use the tension bar. Put the fence on the vise while stretching it correctly. This is important because it helps in correct and proper cutting. Now you can start cutting. You can cut through the tension bars with the help of the bolt cutters. Although, in most cases, it is easier to cut through the links of the fence. Step 2: Cutting The LinksIt is now time to be attentive. Open the bolt cutters and place its jaws on the link that you want to cut. Put an appropriate amount of pressure on the handles of the bolt cutters. You need to be patient. Repeat the same technique with each link that you want to cut. After cutting the links, you can easily remove them. Step 3: UnweavingYes, it is the same step that we have already discussed in the first process. However, in this step, the focus is on unweaving the parts which have been cut. You should be careful while cutting. You should keep in mind that you need to cut the links precisely at the right spot. The cuts should be made where one chain is intertwined with the other chain. This helps in unweaving the chain link and separating it from the fence. Process 3Step 1: MarkingBy now, you must have understood that the marking is an essential step in cutting the chain-link fences. You need to measure the fence and mark it at the critical point. You should use a marker for the purpose. Suppose you need to replace the damaged section of the fence. Now after measuring the damaged area, mark the damaged fence as well as the fresh one. The damaged part is marked to understand that you need to cut from there and remove that part. Similarly, the fresh part is marked so that you can get an idea from where it should be cut in order to be joined. Step 2: Reciprocating SawAfter measuring, you need to cut the fence with a reciprocating saw. Be careful as it can be dangerous if you are new to the tool. You need to hold the machine properly and press the trigger. Put the saw at the marked area of the fence. Make sure to cut the area of the fence before powering it down. It is advisable to wear gloves while operating a reciprocating saw for a better grip. Step 3: Cutting With The SawNow you need to put the blade of the reciprocating saw on the marked spot of the fence and apply firm and steady pressure on the trigger. Make sure that the blade should not waver from its place. It is important to keep cutting on the same spot until you are halfway through the metal. Once it is half-cut, it will be easy for you to do for the rest of the job. Process 4Step 1: Measurement Of The FenceThere is nothing new in this process. You must know by now that it is the most essential and primary step of cutting the chain link fence. So, measure the fence and mark the spot from where you need to cut it. Step 2: Clamping The FenceNow you need to put the fence on the vise. You can use the clamps to hold the fence steady. If you do not have a heavy-duty vise, do not fret. We can use an alternate option. In case of unavailability of the vise, you can use any flat and slightly high surface like a table. However, if you do not have clamps, you will need help holding the fence firmly on the surface to avoid shaking while it is being cut. Step 3: Cutting With HacksawNow you are all set to start the actual cutting. Cut the fence with a hacksaw. You need to be very careful and patient while using a hacksaw. One thing that you should keep in mind is to use a proper blade according to the thickness of the chain link. Once you are done with the cutting, you can smooth the rough edges with the help of a file or power grinder. Safety TipsIt is highly advisable to use all safety measures while working with tools. You need to be very cautious and careful while cutting the fence. You should follow the following safety advice:
Things You Need To Cut A Chain Link Fence
FAQs1. Which is the best tool to use for cutting the damaged area of my chain link fence?You can use any of the tools mentioned above and processes to cut the chain-link fence. However, it is wise to go with a hacksaw or bolt cutters rather than a reciprocating saw if you are not experienced enough. Final ThoughtCutting a chain link fence undoubtedly seems to be a herculean task at first, but with proper tools and knowledge, you can master this skill. Well, now you know everything there is about cutting a chain-link fence. Just follow the steps listed above in our guide about how to cut a chain link fence. Also, make sure that you take all safety precautions. source http://thehemloft.com/how-to-cut-a-chain-link-fence/ Via https://thehemloft.tumblr.com/post/636364485212422144 One thing that decides the strength of your treehouse is the type of tree or group of trees you select. So how to choose a tree for treehouse more effectively? For that you must look at the factors which are a perfect indication of the fact that trees can handle the weight and design of the treehouse. Important Factors To Consider For Choosing A Tree For TreehouseSo to answer your question, how do you choose a tree for a treehouse, we have compiled a list of these essential factors. Just examine the tree for these factors and you will understand if the tree is suitable for your treehouse or not. 1. Type of TreeThe first you have to do is narrow your search to the type of tree that is good for treehouse construction. The legendary treehouse architect Pete Nelson says to stay away from the softwood if you plan to build a treehouse. They are the worst trees for tree houses. You can use a series of softwood trees for a unit but not a single tree. The hardwood tree is considered to best for building treehouse. 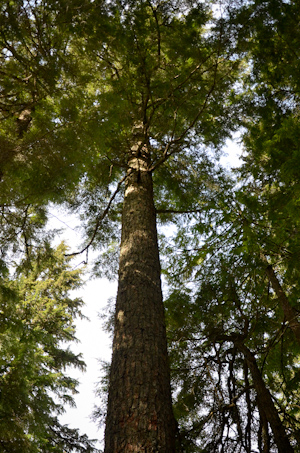
To be specific, go for the deciduous trees. Why? Well, they grow much slower compared to other trees and also have dense wood which is best for supporting a structure like a treehouse. Most of the deciduous trees have hardwood. If you have an option you must choose trees like oak, maple, hemlock, apple, and even beech is a very good option. 2. The Thickness of Branch Or TrunkThe branch and trunk have to take the weight of the treehouse and its occupants. Hence it has to be strong as well as thick enough to bear such load. To give you an idea about the size, for a treehouse of size 8 ft x 8ft, the diameter of the trunk has to be 12 inches or more. And if the tree has more than two stories, you would probably have to use the base as well as some overhanging attachment. For that, you must choose branches that are more than 8 inches. This is just to give you an idea, more the thickness sturdier is the base of your treehouse. 
Another aspect that you have to consider while choosing the tree for the treehouse is the age. So even if the branch or trunk is thick, if it is a dying branch stay away from it. Also, if the branch is too young, do not use if for base or overhanging attachments. They are weak. 3. HeightBeing a treehouse enthusiast we feel, higher we go better is the view and the experience. But be practical when picking the tree for a treehouse. Having a living space for humans at height has their challenges. Higher you go, higher are the chances of something that could go wrong. At extreme heights, the wind is the biggest challenge. You expect a little swaying in the treehouse but beyond a certain height, it is like being in a boat. To determine the safe height for building a treehouse, you must follow the simple rule of the lower third. What we mean that you must construct the treehouse in the lower third portion of the tree where force experienced by the tree from the wind is very low. Even in the strong wind, this portion doesn’t move much. So in a situation like a storm or a tornado, at least you will be able to counter the swaying of the tree. The rest will depend on the structural integrity of the treehouse. 4. Number of TreesYou might want to expand your treehouse two or a couple of trees to have a large carpet area. But it gets tricky when you involve two or more trees. All trees have different movement and each tree puts different stress on the treehouse. If you don’t get it right, your treehouse might not stand for long. 
Hence, many experts suggest keeping the treehouse up to one tree is the best option. However, if your treehouse design needs the support of the two more trees, ensure you choose a group of trees not so much exposed to strong winds. Also, try to use the flexible frame to ensure there is the least amount of stress on the treehouse when trees move. 5. Location of the TreeYou don’t just have to look at the tree but you also need to look at the location of the tree. Depending on the purpose of the treehouse, it has to be at the right location. If the treehouse is for the kids, you want a treehouse to be close to your house as well at a safe location from where kids have ready access. And if the treehouse is for adults you want it to be at the secluded location where you can solve peace. In general, the treehouse should be away from roads, and hustle-bustle of the neighborhood. Also, it should be at the location where you have some good views. 
One more thing to remember while considering the location of the treehouse, it should not violate someone’s privacy as treehouse usually have a good view of the surroundings. It is wise to take permission from the neighbors if you are planning to build a treehouse in a populated area. 6. The Health of the TreeThe last thing you can make sure while choosing a tree for tree house is to check the health of the tree. Even if the tree is alive and flourishing you have to look for signs like infestations, fungal diseases, rusts, etc. Even if you see small signs of these diseases disqualify the tree. Especially when the ailment is on the trunk or the main branches. 
If the ailment is limited to small branches, you can definitely cut down those parts to stop the spread. We suggest you not to choose the tree even if there is a lot to cut down. Overall, tree must have a very good health condition. For treehouse growing tree is the best choice. Remember that! 7. Hire an ArboristWhen you have narrowed down a few trees for the treehouse, we suggest you hire an arborist. You might now want to spend money hiring a professional but trust us if want to ensure that you have chosen the right tree for you and your kids, hiring arborist would save your lot of trouble in future. 
An arborist is a professional who studies the structure and function of the tree. They are also called a tree surgeon. They not only help you choose the healthiest tree but also helps you prepare the tree for the treehouse construction. In the future, if the tree has some disease and it threatens the treehouse structure, they can even help you save the tree. Arborists are easily available. You can just google arborists near me and you will tons of them. Final ThoughtChoose a tree for building a treehouse is generally the first and the most important phase. We suggest you gain as much knowledge as possible and consult as many people as possible to make sure your decision is 100 percent right. Because once you begin construction, there is no going back. source http://thehemloft.com/how-to-choose-a-tree-for-treehouse/ Via https://thehemloft.tumblr.com/post/636326508207734784 The only crafty way to connect multiple treehouses is a bridge. But how to build a tree bridge? A well-built bridge saves a lot of time and energy in moving between treehouses. Being a reliable body, you must build it in a skillful and processed manner. Any compromise in designing may invite fatal casualties. So, to avoid them, you’ll need a trustworthy guide. Don’t worry, for we brought you a more reliable manual. It contains every little aspect in detail. From the required materials to your queries, we got all covered. All you have to do is read and follow it with dedication. How To Build A Tree Bridge For Treehouse?The combination of skillful design and quality materials makes a bridge reliable. Keeping both aspects into account, we know what’s best for you. There are over tons of purchasable materials online. However, only a few serve the best. Materials such as cables, wood, and ropes are the basic materials needed. Based on their reviews in various shopping sites, we bring you the best. Along with quality, your crafty hands matter a lot. The design must be made in a square paper with precision. It is all up to you to decide and select the items for your tree bridge. Therefore, follow to know more about how to build a tree bridge. Types Of BridgesIn general, there are three types of bridges: 1. Suspension Rope BridgesSuspension rope bridges are the most commonly designed rope bridges for a treehouse. These brides are reliable and has a longer durability than any other bridges. Due to varying weather conditions, it remains as an ideal choice. Moreover, the maintenance cost is quite low for a reliable bridge. The availability of construction items is more. Therefore, in this topic, we’ll focus more on a suspension bridge. 2. Fixed-beam Rope BridgesThese bridges are rarely found in any treehouse. Due to its low durability, Fixed-beam bridges are ignored. However, they never fail to give a spectacular look to your treehouse. The maintenance cost is also higher as compared to other bridges. With a simplistic design, they fail to give you the adventurous feel. As the masses of wood is high, rotting starts even faster. Therefore, we recommend you to skip this type of bridge. 3. Log Rope BridgeA log rope bridge is a type of suspension bridge. Bamboo or tree logs are used to cover the base area. This type of bridge is trending worldwide for treehouses. Durability and reliability are assured in these connective bodies. However, the maintenance cost is a bit more than normal suspension bridges. We shall add an element of these bridges in our instructions too. Designing Tree Bridges For TreehouseTree bridges are organic, and there is less metal involved. The designing process determines are reliability of the bridge. Framework and geometry are two important aspects that require more focus. On a square paper, draw the layout of various supporting frame structures like side rails and base supports. The main supporting unit consists of three structures. These are mainly the Bottom piece, the uprights, and the supports. To have a clear understanding, we made you some distinct points. 1. The Bottom PieceThe bottom piece is the structure where the cable will be attached. We recommend you to take its measurement by 5ft. in length, 6 inches in height and width. You will have to make channel cuts to prevent the frame from skidding. There will be three cuts in each log that will ensure the utmost stability. Mark the points taking any horizontal sides as reference. The first cut will be from 1 foot away from the side of reference. Mark that point with a pencil in the square paper. Now, mark the next two points that will be 1½ feet away from the previous mark consecutively. Also, remember that the cuts will be 8cm wide and 5cm deep. 2. The UprightsThe uprights are the supporting bodies for the side rails. Being of high-quality wood, it is one foot shorter than the bottom piece. However, you can vary the thickness of what you like. We would recommend you to choose blocks less thick than the bottom piece. You can also keep the thickness the same, but never increase it. Make sure the upright is made from high-quality wood. 3. SupportsThe support logs the smallest units of the main support unit. It measures up to 2½ feet in length. However, the breadth and height are similar to the uprights. To make it adjustable we need to carve out wood from any of its ends. All you have to do is slender the ends at a 70° angle. A sharp and slender end will act as a slanted support between the two bodies. Without the supports, the frame can’t be held intact. Materials You NeedThe selection of materials is probably the most important factor in building a tree bridge. An improper selection will reduce the efficiency of your bridge. As a designer, you must have the right information of the required products. However, let us do the hard work. We brought you a list of items that are needed to build a reliable tree bridge. These value for money products will fit easily in your budget. It will give you an estimate on how to build a tree bridge. 1. Koch Industries 003292 7 x 19 Reel Galvanized Cable
Koch Industries Reel Galvanized Cable
The cable is the main structure of the tree bridge. It supports the main supporting unit, bearing its weight. To ensure safety, don’t compromise with the quality of the wire. The Koch industries 3/8 inch cable serves as an ideal option. It has over 7 outer strands to provide maximum strength and flexibility. Each strand has 19 galvanized wire that has immense tensile strength. Moreover, it can bear a weight limit of up to 2,880 lbs. So, even a mature rhino can pass without any hindrance. However, in summer it won’t expand due to exposure to heat. Due to its galvanized steel, it will remain strong without catching rust. With an immense length of 250ft, it can even join two distinct treehouse. However, trimming the cable needs a saw motor and skillful hands. 2. Newlng M6 304 Outer Corner Hexagonal Stainless Steel Hex Bolt Set
Newlng M6 304
For every crafty work, nuts and bolts are needed in varieties. Each dimension of nuts has its own characterizes. Among all types, we recommend you the hex nuts and bolts. It is easy to pile them into the wood and gives it a premium look. The newly 306 M6 nuts and bolts won’t let you regret about your choice. This pack consists of 3 different M6 sizes bolts and 40 M6 nuts. Sizes are 40mm, 30mm, 20mm, and 10mm respectively. Depending upon the areas, sizes will vary. Made from stainless steel, the nuts and bolts won’t catch rust even after decades. So, even if your treehouse is in a rainy place, don’t worry. For we brought it keeping everything into account. 3. POWERTEC 71429 Heavy Duty Right Angle Metal Brackets for Mounting
POWERTEC 71429 Heavy Duty Right Angle Metal Brackets
For mounting, metal brackets are the ultimate choice. To ensure your safety, we got the best metal brackets for you. The Powertec 71429 is a perfect metal bracket that fulfills your measurements. With a 90° mounting, this piece of craft is made for heavy machinery. There are 3 stamped gussets for extra strength and flexibility. You will also find 6 mounting holes of a diameter of 3/16”. So, the heavy bolts can easily penetrate the bracket. With its 18 gauge thickness, it will hold your wooden blocks strong. However, you won’t have to worry about its quality. It is made from premium metal coated with zinc. The zinc coating will extend its durability to decades, and it won’t rust easily. 4. Wooden PlanksTo serve as a reliable deck, good quality wooden planks are necessary. The Alexandria Moulding wooden planks are fit for the weight-bearing. Made from the wood of the pine tree, it will assure you quality. Pinewood has a natural resistance to rot and decay. Therefore, this wood will be a part of your tree bridge for long. It absorbs stain and paints in no time. So, you won’t have to spend a long time after waterproofing it. These planks come in different dimensions. We recommend you the plank of dimension 1”×4”×8’. Selecting a heavier dimension will add more force to your bridge. Besides, you’ll don’t want this to happen. Procedure To Build A Tree BridgeYou may be still asking the question, “How to build a tree bridge?” It now reveals the entire process. However, the process is systematic and complex. To make you understand better, we will lay it in a step-by-step format. So, here’s how to build a tree bridge. Step 1The tree bridge will be exposed to the environment 24×7. Therefore, the furnishing of wood is very important. So, initiate the process by squaring the planks of wood. An uneven wooden surface will cause problems in taking measurements. Moreover, it will reduce the beauty of the bridge. You can use a manual or electrical planer to do so. We recommend you to use an electric one, as it will reduce time and effort. After making efforts, the wood will shine. Then, apply grease or an ingrain dye solutions on the exposed ends. However, we would recommend you to choose the ingrain solution. As the ingrain dye is more microbial-resistant, it will prevent the wood to rot shortly. Step 2After a clean furnishing, it’s now time to make the main supporting unit. As mentioned earlier, it is made of three sub-units. Assemble the Bottom piece, the Uprights, and the Supports. Lay down the Bottom piece and fix the Uprights in a V-shaped position. Remember to fix the Uprights at the level you shaped the channel cuts. You can use any polyvinyl acetate glue to fix on top of the Bottom piece. Now, do the same with the supports. Fix them at extreme ends and lay their slandered ends at the arms of the uprights. Remember to maintain the 70° to ensure symmetry of the structure. Step 3The third stage is to lay out the cables. As the Bottom piece is 5 feet in length, adjust the position of the cable. Mount the cable with the metal scrappers in both distinct treehouses. Drill the wood, insert the bolts, and tighten the nut with a pile driver. It’s that simple. Since, there are their channel cuts, lay down 3 cables to be mutually parallel. It is just like the wires of an electric post. Step 4After laying down the cables, mount the main supporting unit on top of the cables. Due to the huge amount of wooden mass, it might be heavy for you. Therefore, we recommend you to take the help of a companion. You need to build the number of the main supporting unit depending on the distance. Lay each main supporting unit after every 1-2 meters. We recommend you lay two MSU(main supporting unit) on each plank joint. Also never forget to mount the MSU on the cable with a U- shaped metal bracket. Now, your bridge is stable as ever. Step 5Now, it’s time to put the side rails and planks between two MSU. Without side rails, you might end up falling. However, no one will like to get their legs broken. For young kids, side rails are a must. So, carefully lay down each plank between two MSUs. Use the big bolts in the box to insert the wood. After laying the planks as per your satisfaction, we’re all done. Frequently Asked Questions1. How much will the entire project cost? Each average bridge will easily be completed under 500$. 2. Is the entire project reliable? The guidelines of the project are laid under proper research. Hence, it’s reliable. 3. How much time will it take to complete a bridge? Usually, it takes about 2 days for a reliable bridge to complete Final ThoughtA tree bridge for treehouse is a mark of reliability and trust. Keeping fears aside, people step into these bridges with a belief. A belief of reliability and safety is what it takes. Therefore, designing a well-established bridge is your responsibility. Our care and concern about you led us to do some research. The above-mentioned guidelines will help your connection to be stronger. All you have to do is to abide by the manual. source http://thehemloft.com/how-to-build-a-tree-bridge/ Via https://thehemloft.tumblr.com/post/636311432962719744 Use all the essential treehouse accessories to chase wildest dreams. No treehouse construction can be completed without adding items such as rope swings, buckets, rope ladders, elevators, and so on. So, let’s dive into the topic and break down different treehouse accessories that you would need with their usage. Tree House Accessories1. Rope SwingRope Swings are typical treehouse accessories and can be installed in several ways. At first, you need to check for the platform, direction, and, most importantly, the rope itself. Then, check the swing seat of it has any. It’s essential to shape and sand the seat if you have cut the wood from the tree to create your own swing seat. Not to say, drilling holes for the rope is another step. These rope swings are mainly attached with anchor shackles for a secure fit. 2. Zip LineIt’s an adventurous option to install a zip line in a treehouse. Even though it’s not too tricky to assemble, but you need to make sure the strength of trees beforehand. The length of the zip line varies upon the area. However, we advise you to not make it long. You can keep it around 33-35 inches from one tree house to another tree. Make sure to follow the ending point 6% lower than the starting point of the zip line. Maybe you need a couple of people for the installation and stretching the zip line from end to end. Check out the sizes of different zip lines cable here. 3. Bucket Pulley SystemMake your treehouse more interactive by adding a bucket pulley system. This treehouse accessories helps you and your kids to lift things from ground to the deck. The system consists of three parts i.e., locking hand, pulley arm, and bucket. The locking hand grid is made from the highest quality plywood for strengthening purposes. Then, you need to design and shape some essential tools such as shaft, etc. to build an overall pulley. You can use nylon washers between any of the moving parts for smooth rotation. After assembly of different components, it’s recommended to screw them directly with the shaft. Next, you need to shape the bucket as you desire. However, it’s a bit time-consuming task to make a treehouse bucket pulley system. 4. Rope BridgeSuspension Rope Bridge can be nicely built within the treehouse. First of all, it must be strong enough to track up a load of already for adults. Initially, you are required to use a high-quality rope for building bridges. Moreover, the base structure of the bridge needs to be checked. To build a treehouse bridge, you may need wire ropes to secure the bridge. You will require both thick and thin lines for the side construction of the rope bridge. You can also get ready-made bridge kit for treehouse. 5. Electric LightingHaving electricity on your treehouse had is own peek. You can work there at night. Beforehand, you need to understand the circuit type for electrical lighting. You can either use low voltage or mains equivalent. However, the low voltage of DC 12/24V is considered better than the equivalent of the main AC 110/240V. You can also use a standard battery with a self-contained circuit to light up the whole treehouse. Make sure to use a rechargeable battery. It saves money and allows winds and solar power to recharge it fully. The generator can also be used to power a treehouse. You must call an expert electrician and ask for different energy-efficient ways to add lighting in Treehouse. 6. Retractable RoofAs the name suggests, they can be opened and closed from the roof whenever required. Though you can also use panels, tents, and canvas to cover the roof retractable roofs are advantageous because of increased flexibility and are less time-consuming. These types of roofs can be used for stargazing, bird watching, etc. It also ensures proper ventilation on good sunny days. In order to build a retractable roof, you need mounting hardware and a suitable roof frame. 7. Cargo Net ClimbThe climbing cargo net is among the exciting tree house accessories. You can use different kinds of netting products for treehouses. The most basic is the 1″ polypropylene rope, which is then netted using different knots or double-slack splicing methods. We recommend using the standard platform for the net, such as the 5/8″ climbing net. Also, keep a barrier net to prevent accidental falls. You may also need to add the net railing to the platform. Rope Net Climb is quite easy to build. However, you can buy the ready-made climbing nets like Swing-N-Slide WS 4481 Climbing Cargo Net. 8. Rope & BucketRope & Buckets is a classic form of a lifting system for a treehouse. Assembling a rope, pulley, and bucket into a lift system would make a great supply system for kids. For these, you must get the right bucket rest is readily available. If you are planning a treehouse for your kids, it is a must have among all the tree house accessories. 9. Tree house SlideYou can install sectional slides in a treehouse for your adventurous kids. You can even build water slides from the treehouse to your swimming pool of you have one. While installing slides getting the angle right is their key. You want your kids to be safe while going off the slide. If your treehouse is 6-7 feet above the ground, you can add a slide. Sectional Slide is excellent for treehouses above this height. 10. Rock Climbing WallPeople make rock climbing walls in a treehouse to add fun and but of physical exercise. The climbing kit is available online all you need to do is install it. One thing you need to make sure is the wall that you build has to be safe and use wood if possible. 11. Fire Pole EscapeAfter you’ve built a zip line, it’s time to think of making a fire pole escape. Safety comes first and needs to be considered deeply. You are also required to view the particular deck height for installation. Also, try to find out stable poles. Reconsider if they are a sort of wiggly and sectional—all you need to check the smoothness and stability so that person can slide upwards and downwards easily. You can also use ready-made steel poles. They are explicitly built with stainless steel tubing and right angle set up with the launch area. It further different possibilities and options to explore. So, make a note to install fire escape poles as an essential protective element in treehouses. 12. Rope LadderIt will be a breeze to make a rope ladder for treehouse if you follow a secure method like this. You are going to need some tools and wood pieces to make rungs for the ladder. Also, check the perfect fit of the bit according to the rope you have purchased. Then, you need to drill holes on a piece of scrap wood. After you are done inserting the string in holes, don’t forget to screw them for a secure fit. In this way, the rope won’t move even in wind. At last, you need to secure the rope by tying them from both ends. Check this rope ladder regularly to make sure all these attachments are intact. 13. ElevatorThe elevator on a treehouse can be built in several ways. However, bicycle elevators are popular DIY treehouse construction projects. Not just the treehouse, these elevators are also ideal in backyards. Elevators can be beneficial when you are tired of climbing ladders. To counterbalance the weight of the bicycle elevator, you need to put some pressure on another side. Instead of using a cable, we suggest using ropes because they have no memory like cables. 14. Trap DoorTrap doors are extremely usable in treehouse construction. They can even act as secret doors. Or, if not, you can transport bulky materials upwards from these trap doors. However, size matters a lot. So, don’t make it too small. For the building trap doors, you need hinges. The door can be built along with the wall, so it will lie against that wall whenever you open. You also need to place a ladder to make the accessible. At the same time, you should check the safety. 15. DrawbridgeYour treehouse must not be too high to make a drawbridge straight into it. Else, you must be better with the elevator. You can either make a drawbridge like a ladder or simply make it flat if want a relaxed approach. However, the DIY woodworkers mostly make it from wood logs and design it like a slanting ladder. It could be more of a like suspension bridge built to ease down the problematic paths. People even make 35-feet high drawbridges when the treehouse is too far to reach from the ground. 16. Crow’s Nest or two-story TreehousesCrow’s Nest is a very cool place on a treehouse. You can also call it an 8/8 platform. Even if you build it on a single tree with durable scrap of wood, it does not move. Plus, you need an additional support system for building crow’s nest. This is a platform, basically a separate place in your treehouse. Some people have even built a trap door on the crow’s nest. It’s pretty awesome to add floors to your Treehouse. You can keep both the stories for different purposes. You need to build ladders, trap doors, or elevator, to access the other floor. 17. Monkey BarsBy adding tree house accessories like heavy-duty monkey bars make your treehouse even more fun. These structures are quite common in treehouse nowadays. Consider rope swings paired with a set of monkey bars. It could be great to add a whole pool of adventurous activities into your treehouse. You can make them from scrap wood, tree stumps, or utility spools. You need a set of power tools to build the monkey bars. The bars can be either built of wood logs or stainless steel. They are generally built below the floor of the treehouse. However, if the treehouse is on extreme height, you can make a separate platform to create those cool monkey bars. 18. Tree House Interior WorkThere could be a lot of customized work inside your treehouse. You can even make a pretty awesome workspace by adding tree house furniture. Or, you can build the entire area depending upon what kids prefer the most. So, customizing tree house decor is always an important aspect. Every Treehouse has its own designated place which needs to be set up according to personal preferences. Use the treehouse walls to portray art designs, photographs, and much more. It’s beautiful if you create a collage of different vintage accessories. Another fantastic idea is to use the treehouse as a library. Use tree showers and feel joyful in the middle of woods where nobody can see you. You can build up a small kitchen in this cool treehouse. And, there could be loads of exciting stuff you can build inside the treehouse. 19. Sleeping LoftSleeping lofts are quite common if you are building a treehouse for overall personal use. It is entirely made of wood and then customized with different own opinions. The loft can be handy for taking short naps when you are using the treehouse for work purposes. At first, you need a design in hand to build a sleeping loft for a treehouse. Then, you have to implement that structure inside the treehouse. For your kind information, creating a sleeping loft inside a treehouse rather than using a bed can save you both money as well as space. So, get ready to be cost-efficient with a loft bed. 20. Secret Storage or PassagesYou can build secret rooms, cabinets, compartments, and passageways for the required privacy. This could be useful when you are sharing the treehouse space with kids or there are usual visits of other family members out there. However, they should be made in extremely hidden ways by expert woodworkers. So, unlike the normal treehouses, make yourself a treehouse with secret things. That would be really fun to live in such a private treehouse space. Final ThoughtWe have compiled a list of treehouse accessories that you can add or build on your treehouse. You can consider them as a standalone project that you can take up to expand your treehouse. We will try to make a post that explains in detail how to build each accessory. source http://thehemloft.com/tree-house-accessories/ Via https://thehemloft.tumblr.com/post/636307648433831936 What makes a treehouse different from other residential sites? Is it because of its construction between trees? Well, probably not. Behind every spectacular treehouse, stands a crafty designer. Due to the unique designs, a treehouse generates a lot of revenue for the tourist department. Your treehouse wouldn’t be that magnificent without a systematic approach. Therefore, we will guide you to layout your design of choice. Mentioned below is a complete guide to the seven stages treehouse design process. Seven Stages Treehouse Design Process1. Check The Norms Of ConstructionThe first stage is bound to the law. If your area is bound to any lawful restriction, know it early. Contact the authorities, asking for their supervision. We recommend you to proceed with the legal procedure by casting a detailed application. Doing this will elevate your status in front of the officials. However, it is the utmost responsibility of every faithful citizen to do so. You won’t have to face any kind of official issue in the future. Being a mere formality, it has an immense significance. Many treehouse owners ignore this initial stage of designing. It causes them heavy penalties from the concerned authority. To save you from such headaches, we laid three important points to be noted.
2. Draw The Design LayoutWhy do you want to build a treehouse? Is it for luxury? Well, you must settle these questions first. If you are raising a treehouse for your kids, consult them first. Doing this will let them reside at their house of dreams. However, if you are taking the designing contract, client satisfaction is your top priority. Ask your client how he/she would like his/her treehouse to be. Being a designer, allow them to lay their opinions first. If their requirements are realistic, you can add modifications. Never proceed with the designing process without necessary feedbacks. Have you selected the perfect tree? If no, you are missing the most vital domain of designing. Tree selection is the most important stage in installing a treehouse. A strong and healthy tree can bear your residence for years. Without proper selection, you are risking your life. The probability of collapsing increases when you select the wrong tree. We advise you to check the humus content of the soil, as it is important to predict tree growth. Measure the girth of the tree with a precise measuring tape. The etape16 is a digital measuring tape that will guarantee you with an accurate measurement. After evaluating the mean values of the girth, note it down. Now, it is time to measure the beaches. Measuring the length of branches with a tape is an impractical idea. However, it is not safe, as you might end up with a fall. For such purposes, a measuring string serves you right. We recommend you the Greenie 435 polyester measuring string. Due to its excessive tensile strength, measuring the rough branches will be an easy task. Remember that all measurements must be relative to the floor level of your treehouse. After all measurements, draw your estimation on the squared paper. 3. Distinguish The Supports From The FrameworkUsing your 3D viewing, it’s complex to imagine the framework. Well, things are more simplistic when you keep your treehouse at a moderate height. Select a suitable height for your treehouse from the ground. A much higher altitude may increase the chances of collapsing, as the trunk grows more brittle at the top. Thinking about the casualties ahead, never project the floor way upwards. On the other hand, a much lower altitude won’t let you enjoy residing in a treehouse. In the absence of the feeling, you’ll miss the whole essence of residing in a treehouse. Fixing the walls and roofs to branches is the most common mistake made by people. A skillful designer will reject this fallacy to his utmost sense. Branches at higher altitudes are more brittle. Thinking those brittle branches as rigid support isn’t a bright idea. Many treehouse owners ignore this point of distinguishing. When the weather is bright and sunny, they don’t realize the consequences of this terrible mistake. On stormy weather, there are heavy chances that these beaches might fracture. Therefore, thinking about your safety, we recommend you not to keep the branches intact with the roof or the walls. The wall is supported by itself. However, to make foundations strong, walls must be rigid. To let this happen, you have to master the art of selection of wood. Low-quality wood decays in no time. The early decaying of wood might be a fatal blow to your designing process. In this case, losing alignment is the most common problem seen. Walls the responsible for bearing the weight of your roof. To provide the utmost stability, design them to be in a linear order. Besides the roof, it has to bear it’s own weight too. So, design the walls to be in a linear alignment supporting the roof. 4. Create The Space For PliabilityUnlike human beings, trees grow throughout their lives. The girth you’ve measured will keep on increasing as an annual ring. Without flexibility, your treehouse will have to bear cracks and leakages. A proper flexible design becomes a necessity when you select two trees for your treehouse. In absence of that, heavy winds may blow your treehouse-like dust. Therefore, we recommend you maintain the flexibility factor following the trees. Since trees are accustomed to flexibility, your house of dreams will have to cope up. If your treehouse is in intact with two trees, metal brackets are a must. It acts as a shock-absorber, creating the room for flexibility. With many shapes and sizes, these instruments of craft will be suitable for fixed and flexible joints. However, there are several factors to keep in mind.
Never choose more than two trees for your treehouse. A wide selection of trees will result in excessive tensile forces on your frame. Due to the uncoordinated movement of the trees in wind, you’ll be the one in the loss. We recommended you to mount your treehouse on the strongest tree. This will provide the necessary leverage even on a stormy day. 5. The Bolt SelectionBolt selection is an art of exterior treehouse designing. With a wide range of bolts, it might be difficult for you to choose the right. Enabling proper growth, a strong bolt ensures safety and hostage for your treehouse. Besides treehouse, you’ll have to ensure safety to the tree too. This is one of the socio-environmental reasons why you must seek reviews. With the right drilling machine, pierce the tree only once. With several drills you might damage the heartwood, hampering its growth. Remember that a tree is counted as a living being. Instead of small screws, we recommend large bolts. Bolts of 8” length and 1” thickness are strong enough to handle shocks. With strength comes reliability. Large and strong bolts are the primary choice of skilled designers. However, smaller screws and nails are needed to be inserted in large numbers. So, the tree-loving guests at your residence won’t be much pleased at this act. Therefore, we recommend you large stainless bolts that will be a more reliable option for your treehouse. A rusty bolt might end up in oxidizing the metal brackets too. To ensure less damage, lag bolts can be very useful. Lag bolts are specifically manufactured to bear a heavy load. Also, it can be used to connect several fulcrum to a point of leverage. Ensure the safety of each joint by the process of overbuilding a minimum of 4 times. Doing this will help to retain the flexibility by allowing three-dimensional movement. Moreover, these lag bolts can reduce unnecessary metal rattling which turns out to be very annoying. Therefore, we recommend lag bolts keeping the refinement into account. Being a crafty object, the seven stages treehouse building process is incomplete without these. 6. Allow The Tree To GrowYou’ve selected the healthiest tree. A healthy tree is subjected to growth throughout its life. The meristematic tissues are responsible for this spontaneous growth. The activity of these growth tissues is more concentrated at the top. This projects the growth process as a function of height. Therefore, without hampering the growth process, the upper end of the tree must be kept free. Besides, without proper growth, the tree won’t be a suitable option for your treehouse. Don’t tangle the upper branches with cables and connectors. A unique design is when you progress the electrical connections from the base. It would be wiser if spacers are installed between the beams and the tree. Doing this will allow the growth process to continue without any complexities. Preparing for the harsh conditions is a wiser strategy. To save your treehouse from calamities extra efforts must be made. Taking the growth and movement into account, make a gap of 2”(approx.) around the floor. Doing this will allow the tree movement, keeping you stabilized. The stronger the base, the more reliable it will be. In case the trunk passes your roof, a 3” is slit is necessity. Without the necessary space, your roof will be more vulnerable to cracks. In that case, the entire waterproofing system won’t be of any help. Therefore, allowing the tree to grow is vital for the seven stages of the treehouse design process. 7. Levitation Of The TreehouseIf you are planning to reside in the treehouse for a long term, ground it as much as possible. The higher you mount your treehouse, the safer you’ll be. As you move up, the thickness of the tree depletes. To reside in the strongest zone with more flexibility, the lower trunk is a suitable region. This allows you to be more accessible to the workplace. Goods such as metal brackets and bolts can be easily transported with the help of a pulley. With easy accessibility, your work will be completed in no time. Besides, some items might get lost easily. Such items like bolts and screws are costly and significant. A more grounded workspace will prevent those crafty items from getting lost. Last but not the least, the levitation stage completes the seven stages treehouse design process. Final ThoughtDesigning is a tool to sketch the imaginations to reality. A crafty design is the backbone of the treehouse industry. Without the guidelines, the designing process won’t show its color. In turn, your treehouse won’t be appreciated by spectators. However, there are many claimed stages of treehouse designing. Only a few of them seem to be efficient. Easing your efforts, we laid the seven stages treehouse design process. It will effective only underactive and dedicated supervision. source http://thehemloft.com/seven-stages-treehouse-design-process/ Via https://thehemloft.tumblr.com/post/636296307400687616 Looking for good quality tree house plans and design? Here, we offer you 50 free plans and designs that you can download. We have compiled these plans from different resources. Choose the one that fulfills your requirements and just start building it. But one thing to remember is you must get the proper knowledge before beginning the construction. Collection of 50 Treehouse Plans And Design For Inspiration1. Deluxe Treehouse Plan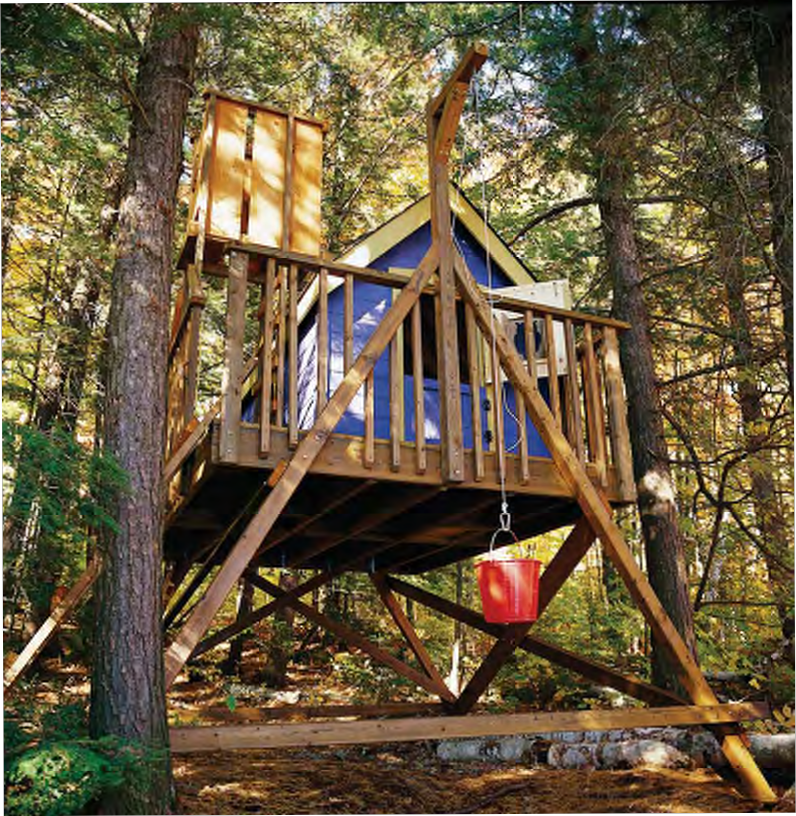
It is a simple treehouse that is suitable for kids. You may not consider it is a typical treehouse because it has its own base. It didn’t use any tree as the base. Hence this makes it a good option among tree house plans and design if you don’t have a suitable tree for the house. The house comes with a deck and a pulley system for easy supplies. 2. A Treehouse With Large Deck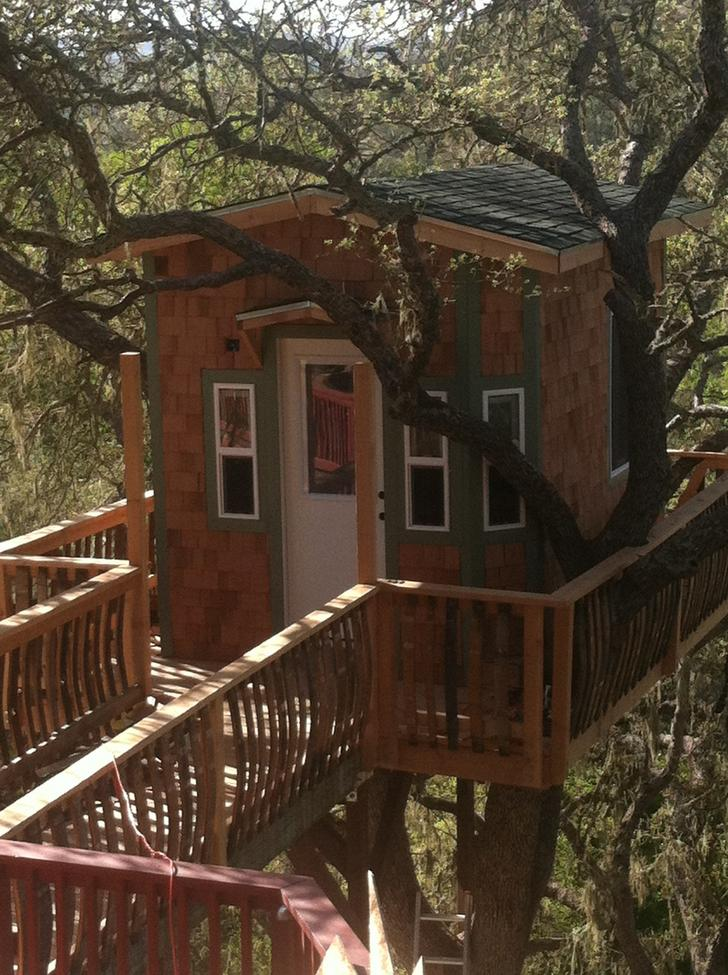
This is a perfect treehouse for adults. The design has 12′ x 18′ deck which is fairly large compared to other designs we have seen. Also, the builder has accommodated a bridge to other trees which can become a base for another treehouse. We found this design on Imgur. Though there is no proper tree house plans and design drawings the user has uploaded detailed images of all construction phases. 3. The Little Fort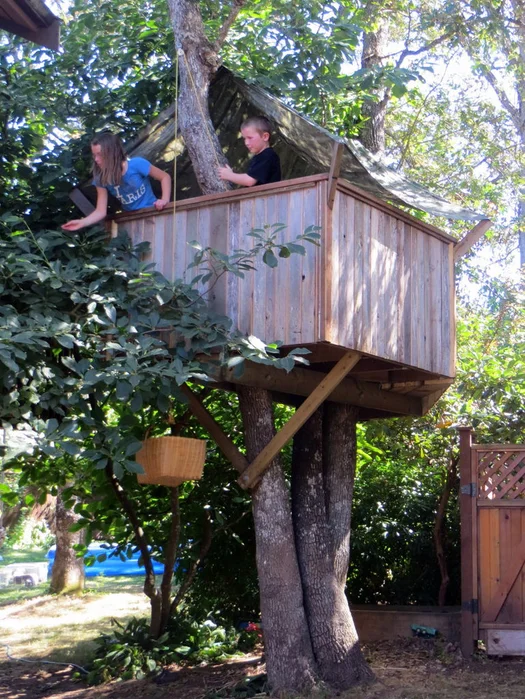
If you don’t have an extensive budget to build a treehouse (see books related to building treehouse), you can build this little basic fort. It has also deck with walls and a tarp based roof. Any amateur builder can make this fort in his backyard as you won’t need a too-big tree. 4. The Ultimate Kid’s Treehouse
This treehouse gives you a place where adults can enjoy themselves with their kids. It not only has multiple decks, but it also has two repurposed slides. In addition, it has a sandbox made out of an old boat at the bottom of the treehouse. Yes, this could be an expensive venture but it is one of the best among tree house plans for adults. 5. Pirate Treehouse
If you are looking for a tree house plans and design that has some theme from kid’s fantasy, this pirate-themed treehouse can be a big hit among your kids. You can compare it with classic 8’ 8 treehouse plans. It is a one tree design that uses trees as well as wooden posts for support. Due to wooden, posts, you can get enough space deck. Though it is a pirate-themed treehouse, you can give it any theme by changing the interior design. 6. The Mega Treehouse on Farm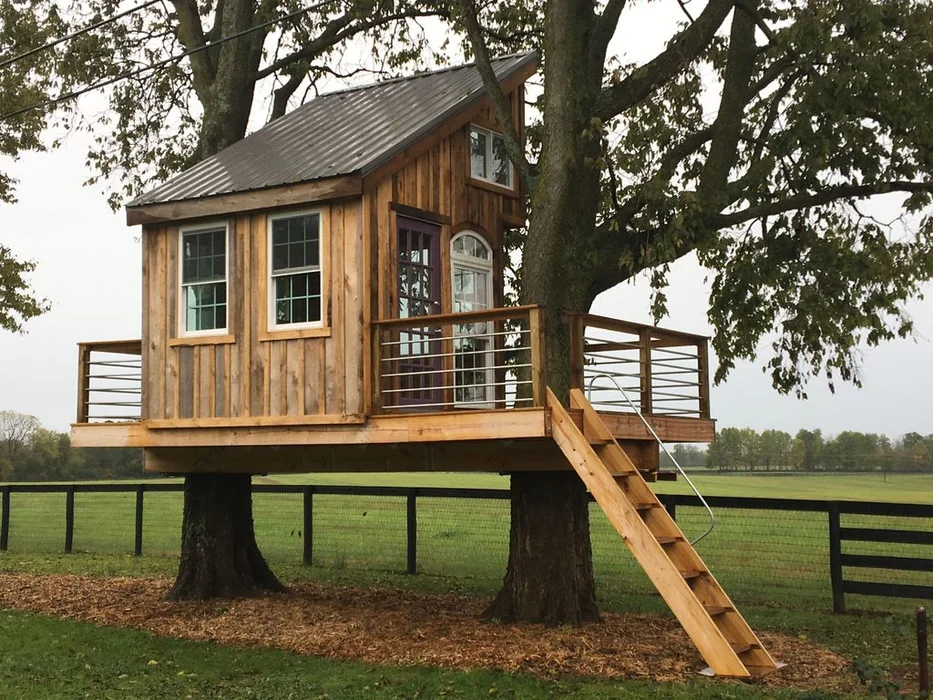
Looking at the size of the treehouse, you can say it is almost a tiny house. It has a large deck all around the house which is perfect for getting views from all sides. This treehouse uses two large hackberry trees as support. This kind of treehouse is perfect for all ages. The builder had designed the house in a way that even old can use it. 7. The Tree Deck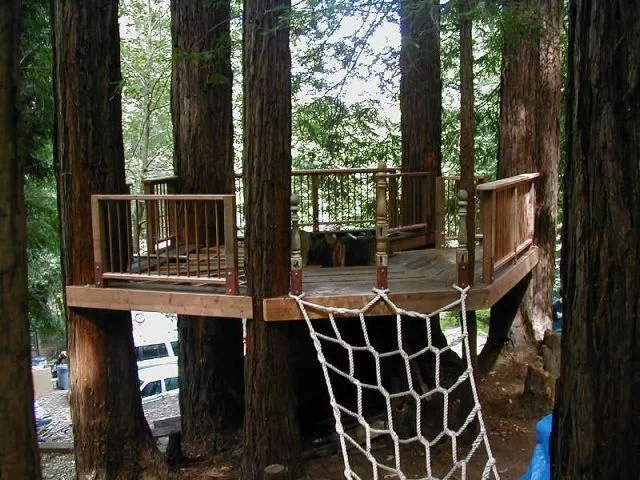
If you are not concerned about having a full-fledged treehouse with a roof, you can go for a simple mega deck. It is perfect treehouse parties as well as for activities like bird watching, hunting, meditation, etc. The major requirement for this type of deck is spider web support which means you need a group of trees together in close proximity. You can also add a house structure on this deck if you want to expand on this plan. 8. The Open Treehouse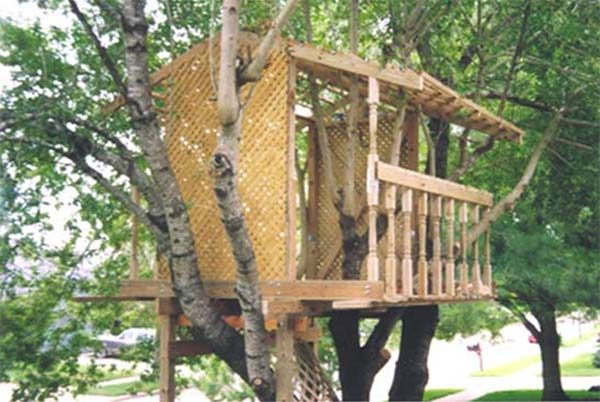
This is a simple treehouse with a roof which is very easy to build. If your area doesn’t receive much run throughout the year, this could be a good treehouse for the kids. It is open from two sides which allow you to enjoy the view as well as have enough room on the deck. 9. DIY Treehouse Deck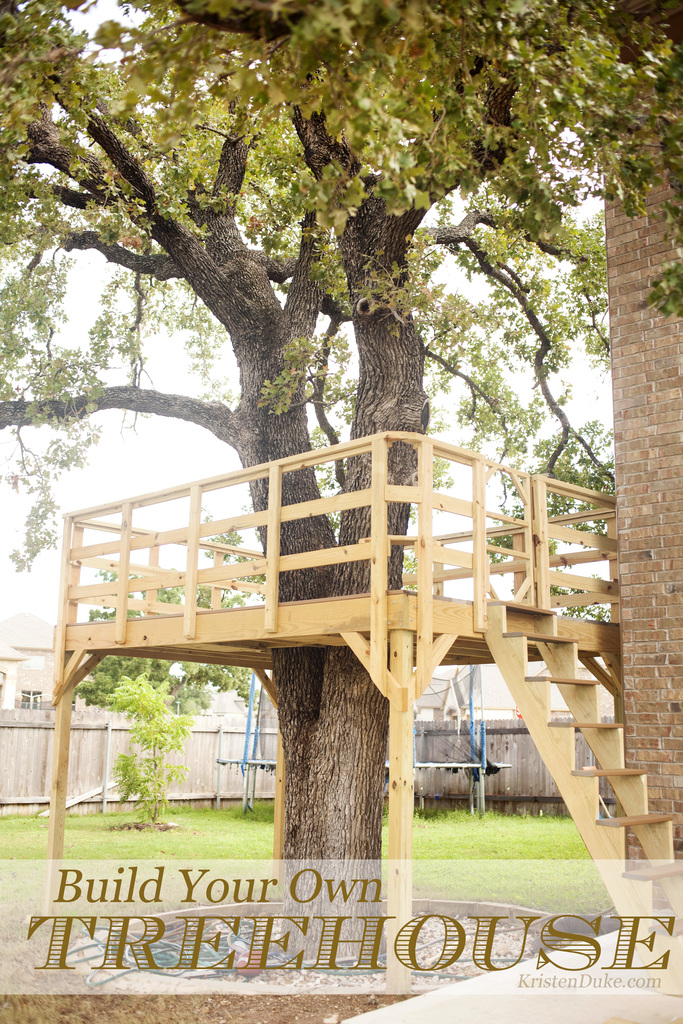
If you have a tree in your backyard and want to add a simple deck to it, so that you and your kids can play together, it is a very good option. Also if you want to involve your kids in the construction process, this is probably the simplest project that you and your kids can build. All you need is a tree in your backyard and simple tools. 10. Campsite Treehouse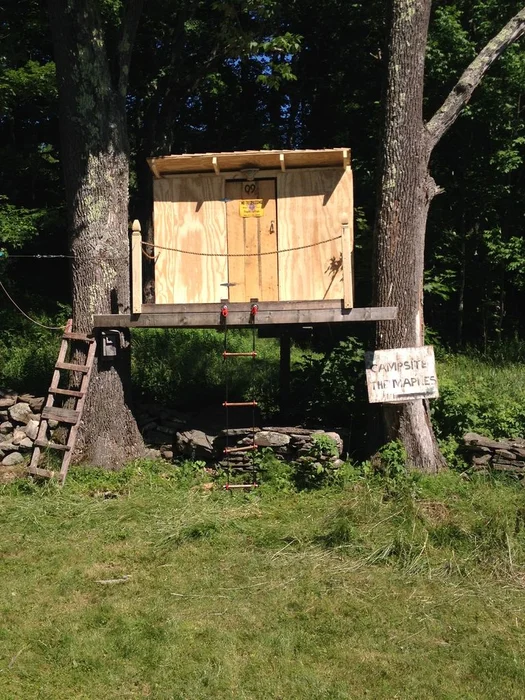
For someone who is an avid camper would love to spend some time in a treehouse in the middle of nowhere. If you have that nowhere but need a treehouse, this design is just for you. It is the ultimate rustic treehouse designed for camping. You don’t need fancy things, just some plywood of wood and two strong trees to support the house. 11. Treehouse With Spiral Staircase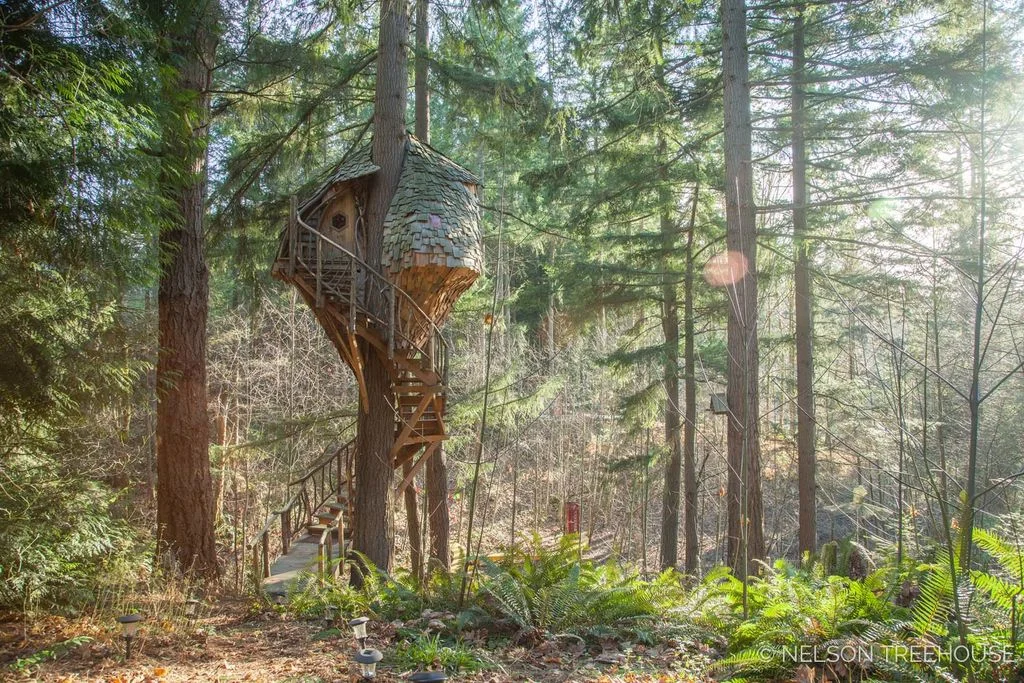
If you have no issue with little advanced construction, you go for complex tree house plans and design like this treehouse with a spiral staircase. This type of treehouse does not look elegant but allows you to access the treehouse at height with safety. This plan is more about making a winding staircase then treehouse. You can accommodate these stairs with any treehouse. 12. Reclaimed Treehouse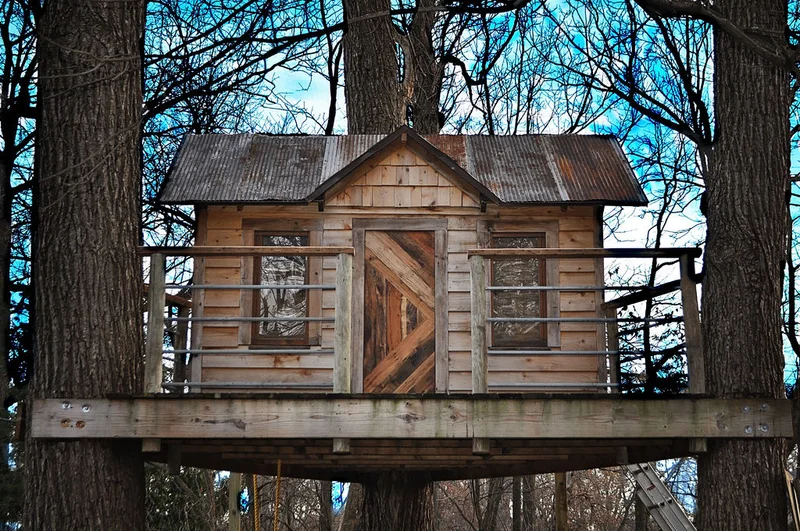
This cool looking house is one great piece of construction. If you follow the plan exactly, you might be able to replicate this treehouse in your backyard. This plan is based on the three tree structure. The most unique feature of it is the triangular base. Though the original builder used reclaimed stuff to build the treehouse, you can use new and fresh stuff if you want. 13. The Simple Treehouse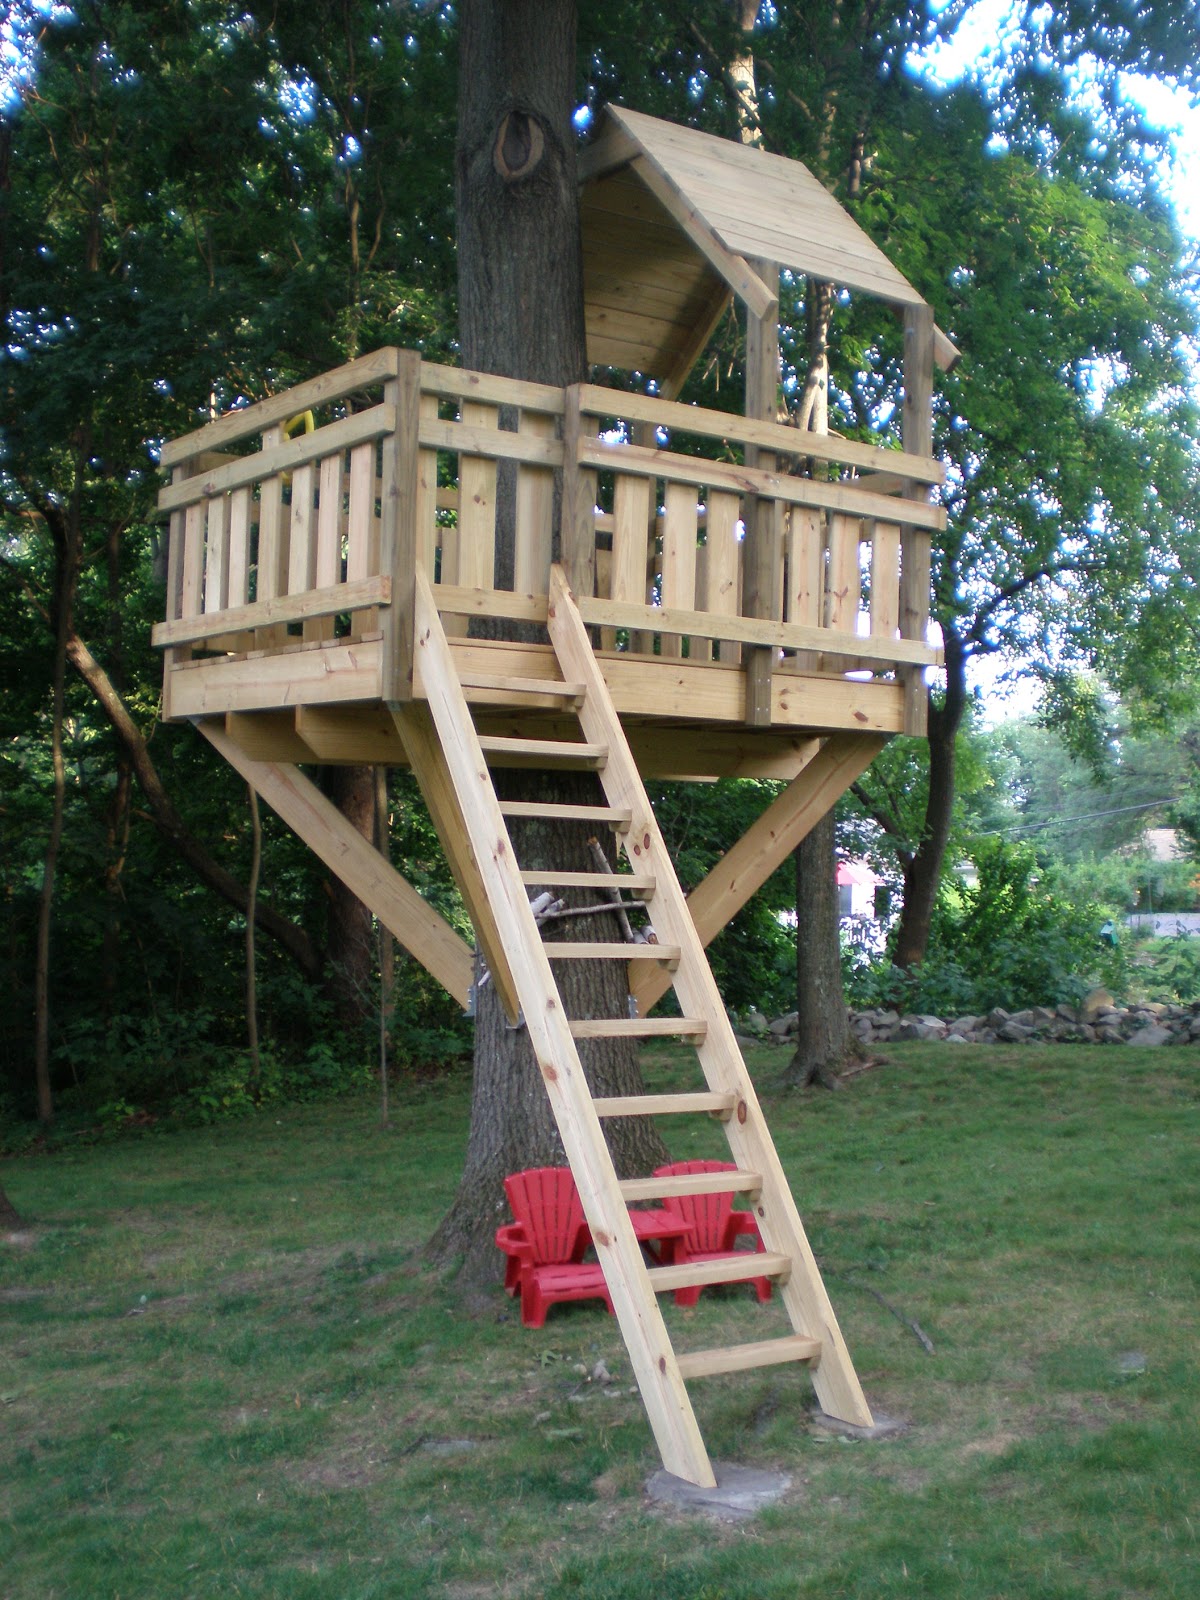
Sometimes all you need is a simple design and simple construction. It is one of the few simple tree house plans and design that cover all the requirements of a treehouse. It has a roof, deck, and stairs. You can also alter the design as per your needs. You can increase the size of you have a large enough tree to support it. 14. A-frame Treehouse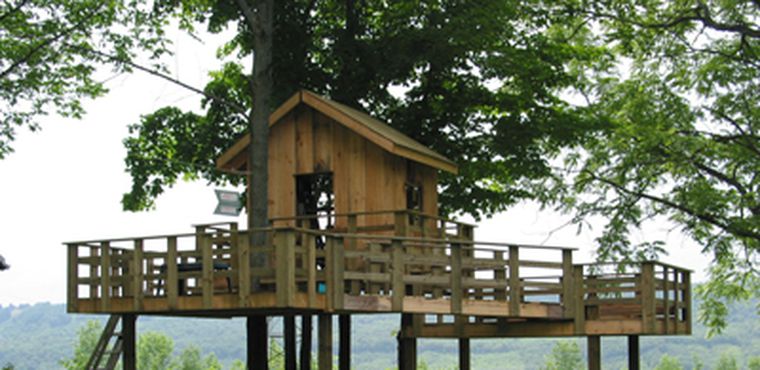
A-frame treehouse is the most common design used in building treehouses. This plan will help you to build your dream A-frame treehouse. This design gives you a place for a small take as well as a house with a roof. You can decide on what kind of access you want. Depending on the height you can go for different types of a ladder. 15. Modern Treehouse For Kids
A modern looking treehouse not only bends the rules of traditional treehouse building designs but also gives your kids something fresh to explore. Also, the building is so easy that you can even build it on your won with the help of your kids. The best part is it has its own base which means you don’t need a tree. This could be your perfect backyard treehouse. 16. Another Backyard Treehouse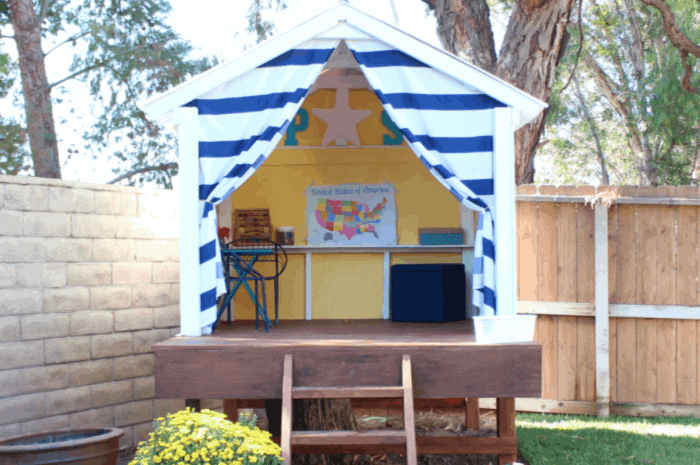
One more design that doesn’t need any kind of tree. It is easy to build and requires a very little budget. As it has very little height it is perfect kids and you won’t have to worry about the safety of your kids with this design. 17. Hanging Treehouse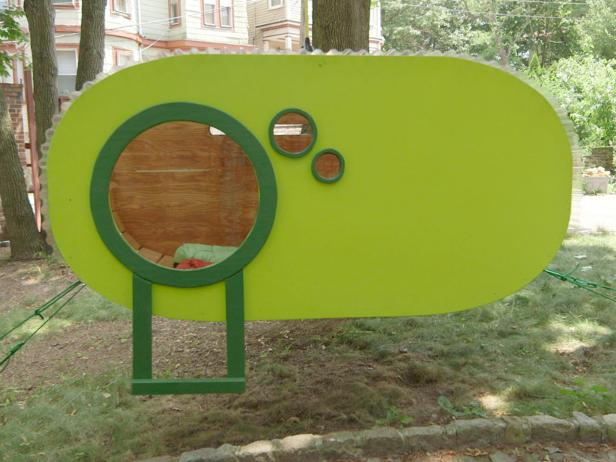
Compared to treehouse this has a unique design. You can say it is a tree pod. Since it is a pod, it is where your kids can hang out. Though not enough room to play it is a good place to have sleepovers. Even adults can enjoy some alone time in this pod. The best part about this plan is it won’t take long. You can finish it in just two days. 18. Treehouse With Climbing Wall
A treehouse with a climbing wall would be perfect for your kids. It can be a place where they can entertain themselves as well as they can get some physical exercise by climbing the wall. It also has a deck and house unit with the roof if your kids want to spend some alone time playing board games or reading books. 19. Marble Mount Treehouse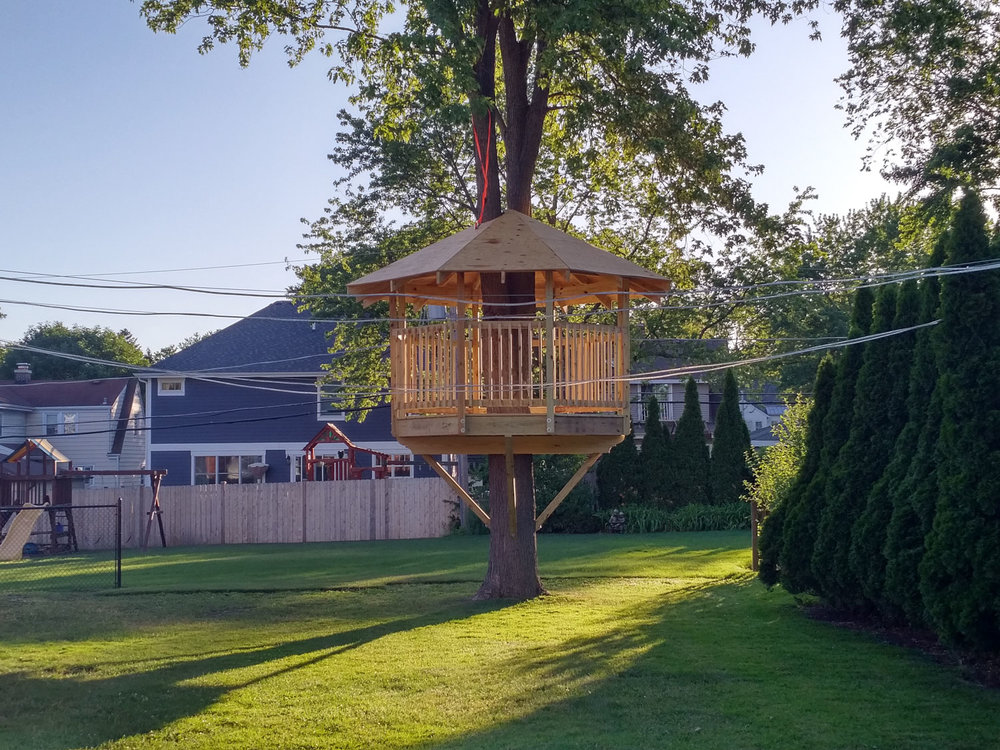
If you are planning to build the treehouse that has the best view all around, you want it to be on a tall tree. This design is perfect for building treehouses at height. The plan is more about building the best support system on any kind of tree. Hence, use this design in combination with other treehouse designs. 20. San Juan Treehouse By Nelson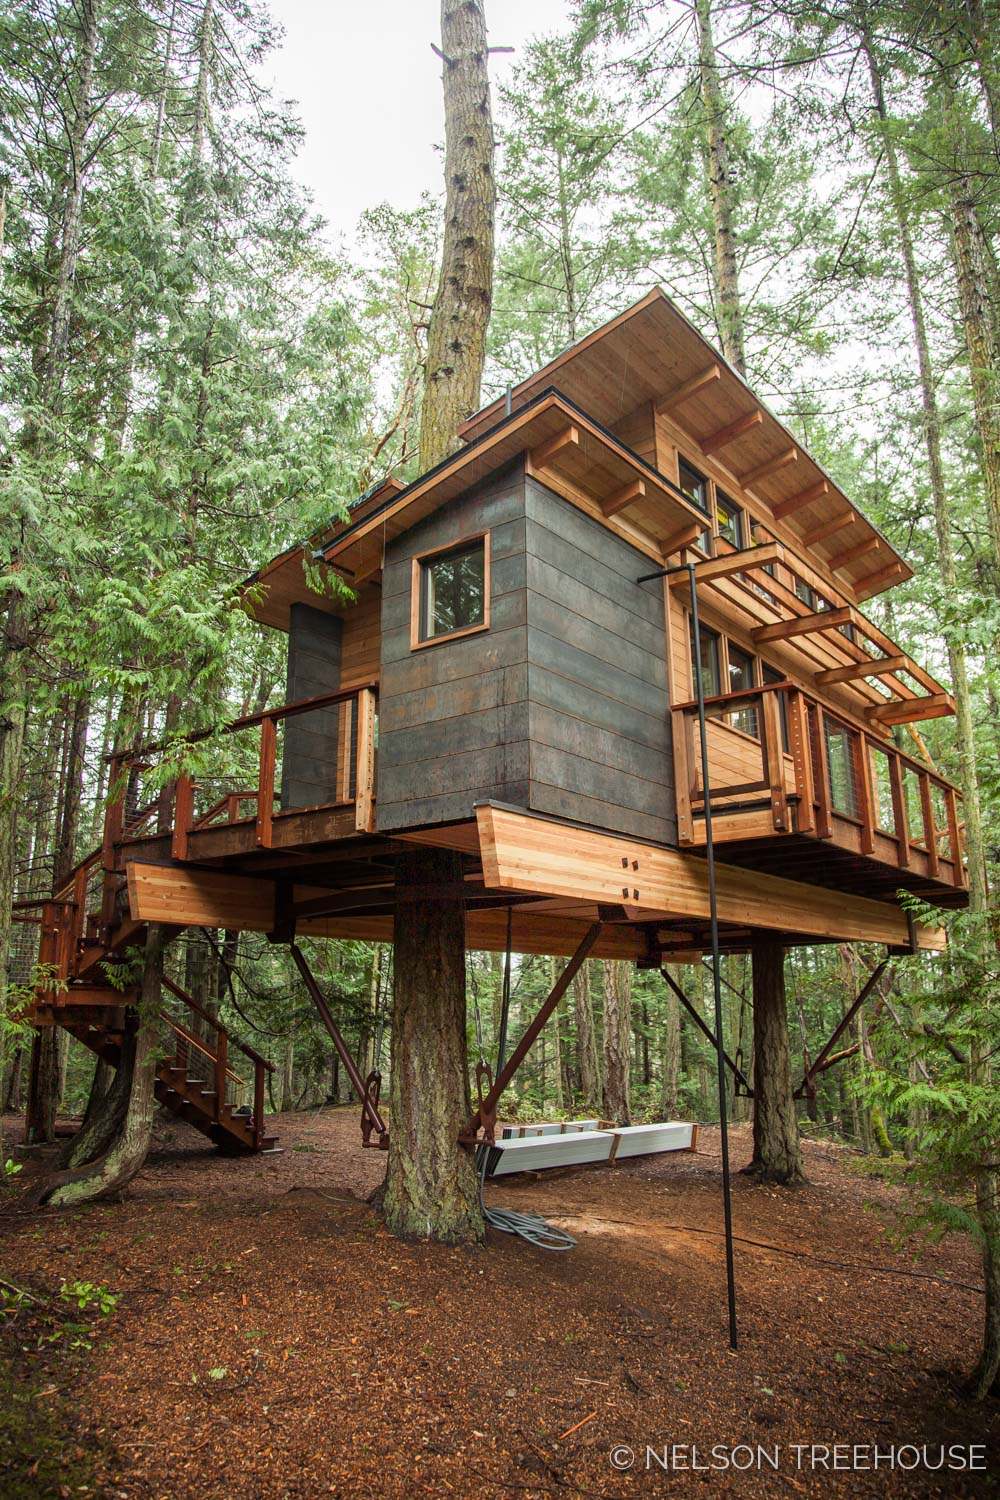
Nelson treehouse is a popular company that has developed lot of tree house plans you can live in. This one could be an outrageous project take up for an amateur. But if you plan to build a mega treehouse and you have the money as well as time, we would suggest you look at this design for ideas. They have posted a lot of construction pictures of this treehouse. 21. A Tree Fort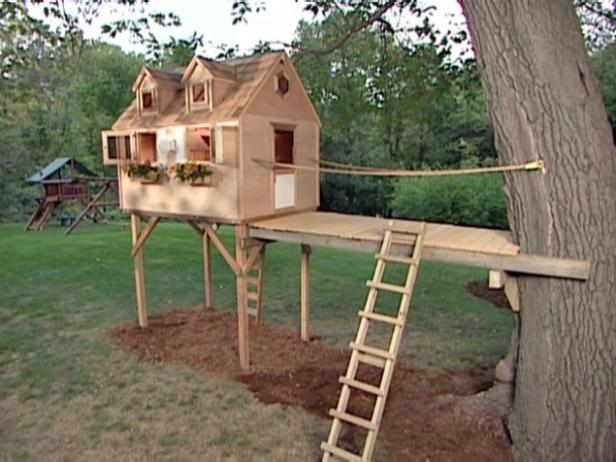
Kids would love to play in their tree fort. Looking at the design it definitely looks like a fort. Though it does completely takes the support of a tree, it does have a bridge that leads to the tree. The bridge itself acts as the deck which is connected to the ladder for access. 22. A simple treehouse deck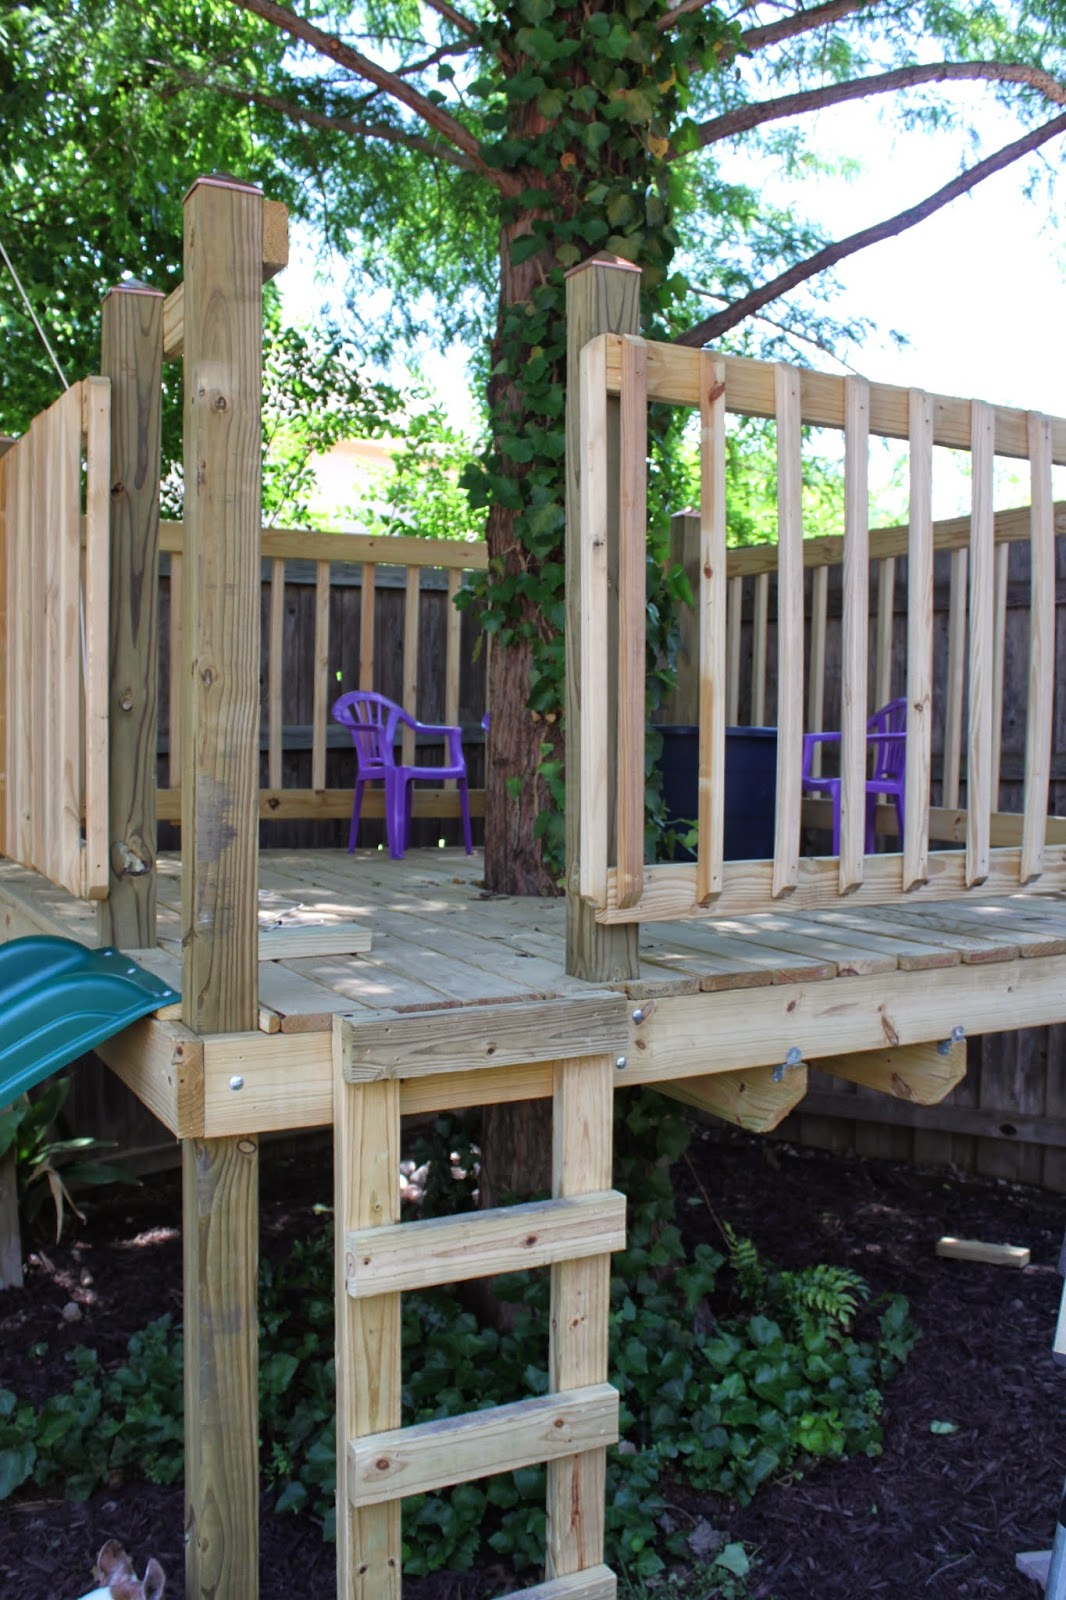
A website called craftytexygirls.com posted a detailed blog about their ambitious project of a treehouse. This probably the simplest form of a treehouse that can have in your backyard. They even attached a slide from the deck. It is highly safe and gives a lot of space for kids to play. 23. off-Grid Treehouse By Nelson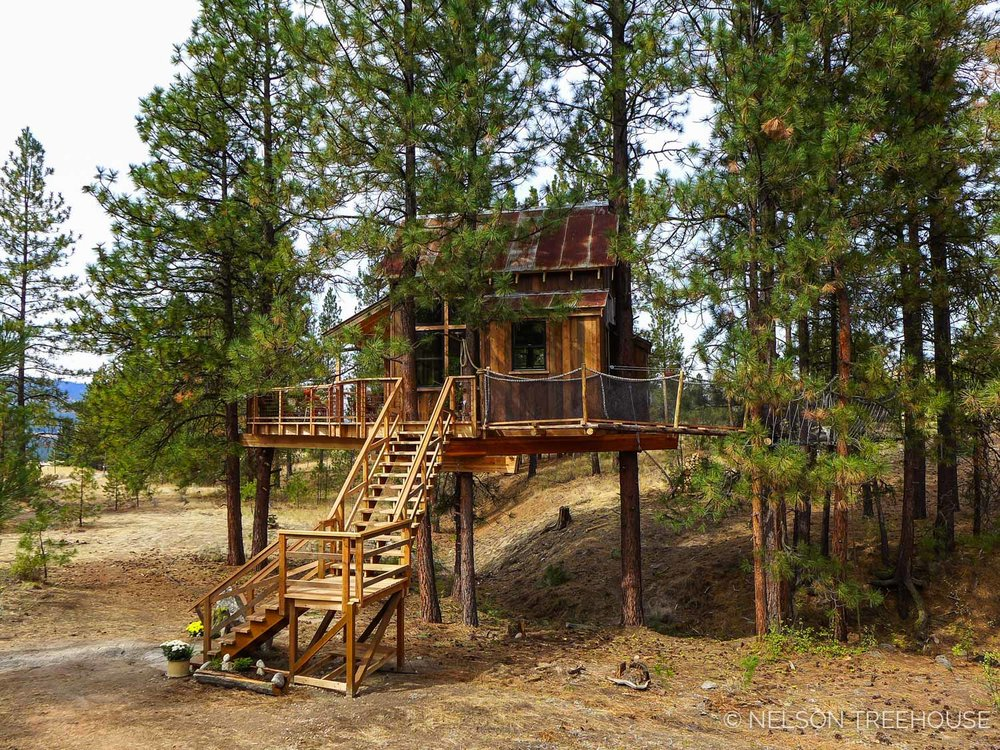
If you are looking to move to woods and live a minimalist life, you would love tree house plans and designs by Nelson Treehouse. Looking at the way it has been designed and built, you must admit this how a treehouse should be. Nelson Treehouse has posted a lot of pictures of the property from which you can take ideas if you want a similar kind of treehouse. 24. Southampton Treehouse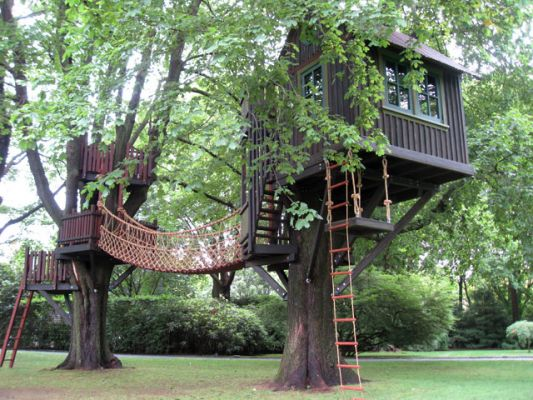
If you have two huge hardwood trees on your property you take a look at this tree house plans and design. It has three level decks, a bridge, and a living space. Not just kids, any adult would love to spend time in this treehouse. Yes, it would test your treehouse building skills but looking at what you get at the end would, you must try it. 25. A Classic Treehouse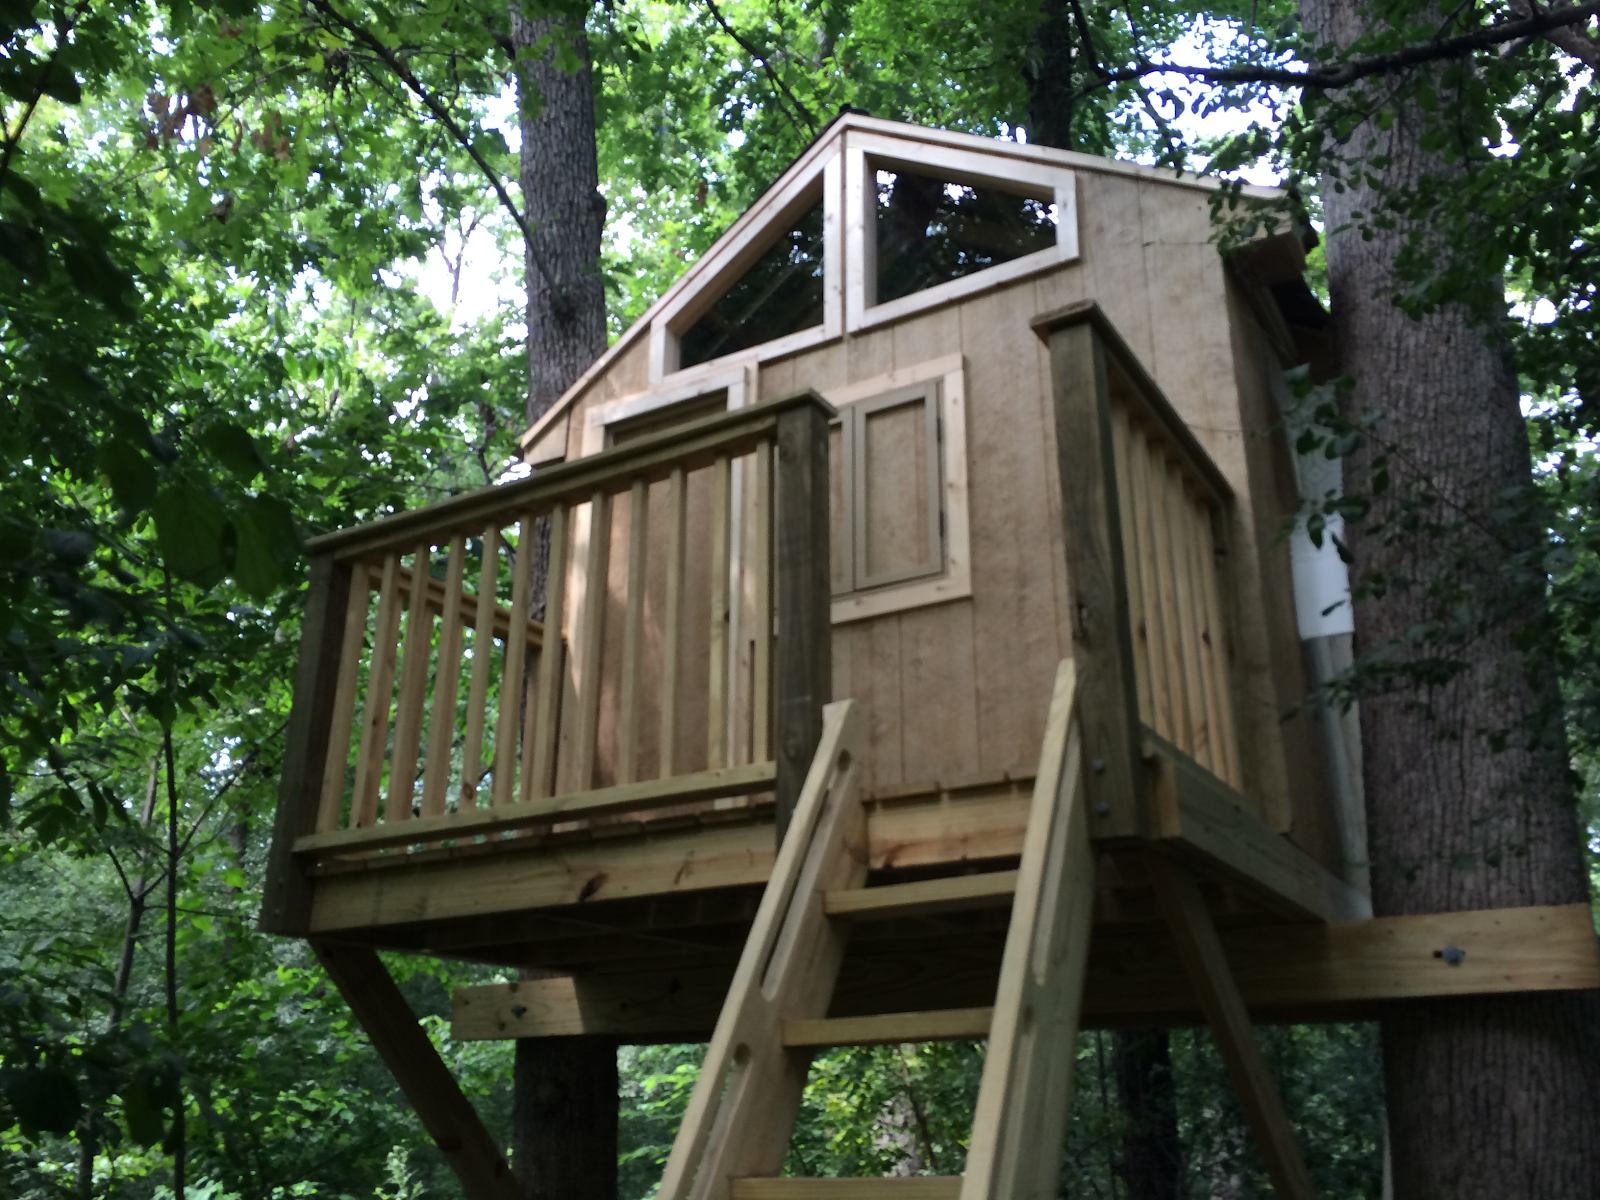
A classic treehouse design that you can build around two strong hardwood trees. The treehouse has a deck and ladder access. The original creator of the treehouse built the unit in the woods. Looking at the design it feels like it can be used by both kids and adults. However, you will have to be prepared for extensive construction. 26. Coyote Valley Treehouse
It almost gives you an impression like it is something out of kid’s fantasies. The most striking features of this treehouse the winding stairs that lead to the house. This type of treehouse is suitable for trees that well spread branches. The complete structure spread over three huge trees. 27. Long Island Tree House
Another treehouse that is perfect for any backyard with a tree. The complete structure uses one single tree. It has a fairly big deck and a house that is designed for kids. The good thing about the design is that every precaution is taken to makes sure that the structure is safe for the kids. 28. Hillside Tree Forts
If you want a treehouse that has slides, swinging bridge, fire pole, rope net, ladder, clubhouse, and zip line, you must take a look at this tree house plans and design. It could turn out to be a kid’s paradise. The house may look simple but there is a lot on offer kids to keep them entertained. But for this, you might need a series of trees. 29. Bluebird Treehouse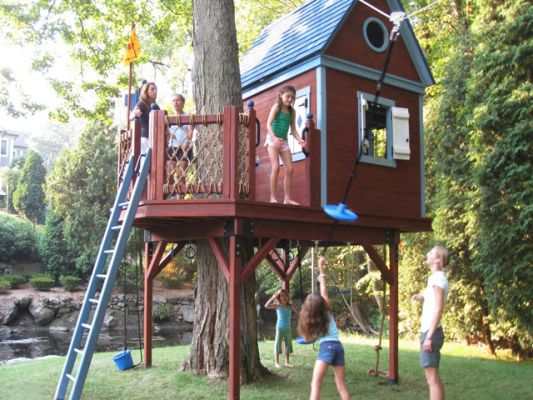
The image is of this treehouse self-explanatory. Kids are going to have blast on this type of treehouse. You can incorporate disc swing, knotted rope, monkey bars, and many more. There is also a lot of space underneath the treehouse where you can add even a sandbox. It could be easy to build as it needs only one tree. 30. Tree Top Inn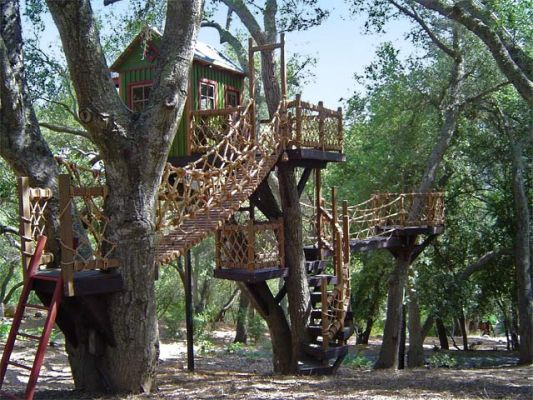
Building a treehouse of this would need a lot of money, time, and expertise. But if you have all of that there is no reason to no take inspiration from this magnanimous treehouse design. It not only has bridges but it has several levels of decks. Well, you can change the design depending on the trees you have. 31. Simple Treehouse Fort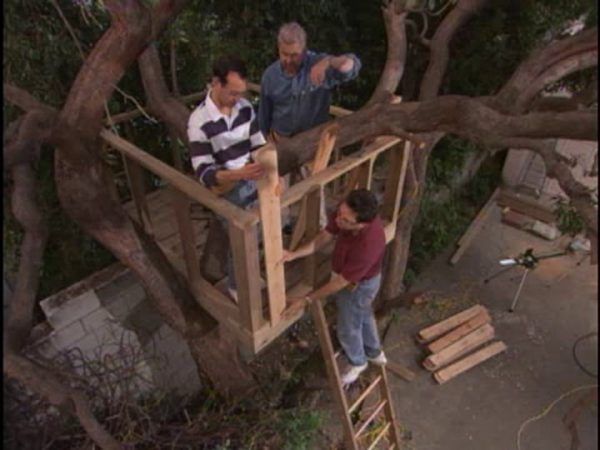
If you are amateur and had never ever built any kind of treehouse. This is one of the few simple treehouse plans and designs that could be for you. Just go to treehouse plans download from the link and strat building. It is a simple single tree structure with ladder access. You can definitely add walls and roof if you want. 32. Bamboo Treehouse
When you think of treehouses, you think of a structure made out of wooden planks and plywoods. But the bamboo treehouse is very popular in South Asian countries. The great thing about these treehouses is everything comes from the forest and not the supermarket. Even the roof is made out of leaves. You can definitely try making one. 33. The Lean-To Tree House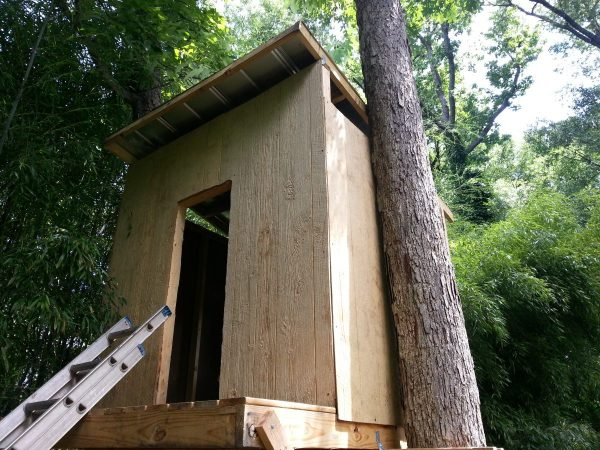
Another simple looking treehouse that anyone can build. It needs very few raw materials and you can build it in no time. This design is good for beginners. 34. The Picket Tree FortWe like the simple design of the treehouse. It is a good design for anyone who wants to build a treehouse with their kids. This treehouse can be built on any kind of tree because it uses a base for supporting the structure instead of the tree. It great backyard project for the kids. 35. Minnesota Treehouse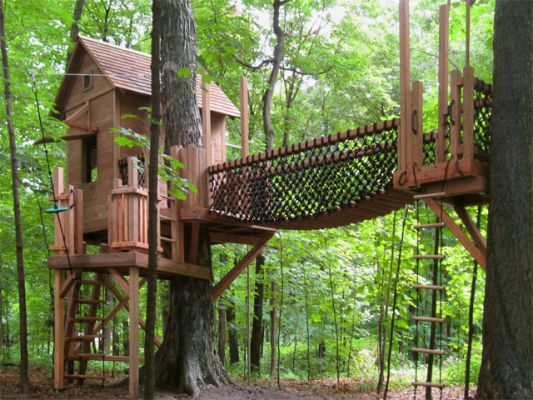
This one treehouse is built in some woods of Minnesota. But the design gives you a lot of ideas if you want to build a treehouse in some secluded area. There is a lot you can do with this treehouse design. You can add zip line, bridges, rope ladders, and many more. It could be great for kids in the woods. 36. 14′ x 12′ Rectangular Treehouse Plan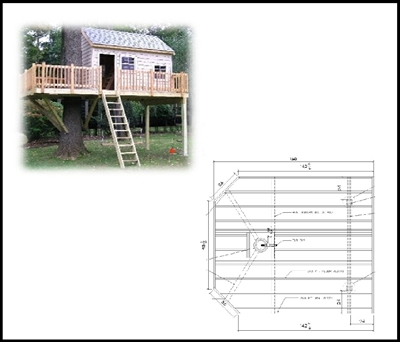
If you are looking for one tree and two pole kind of treehouse, this could be a great option. Looking at the size, you can say it is for both adults as well as kids. This plan is not free as the other plans in this list. But if you need a well sorted plan where you don’t have to thing too much, you must give this plan a try. 37. Hexagonal Treehouse Plan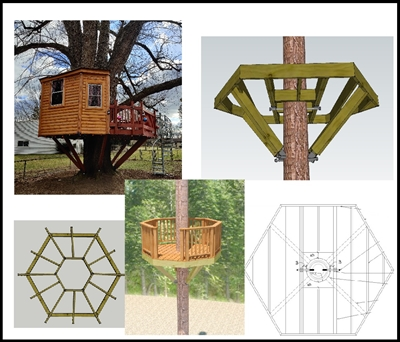
The hexagonal shape is very popular among the treehouse builders. The main feature is it uses the trunk as the pillar for the whole structure. And you also get a 360-degree view from the house. Again it is a commercial plan that you will have to buy from the treehousesupplies.com 38. Octagon Treehouse Plan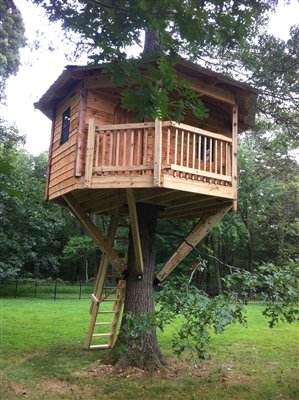
The great thing about buying a ready made plan is that you get a 3D model of each step to guide through the construction phase. This is another design that gives you a unit that uses one single tree and you can also customize the octagonal platform as per your requirement. 39. Square Treehouse Plan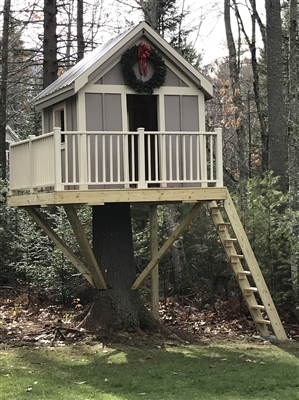
We like this plan because it is simple to make and uses a single tree. You can get different variations of this plan depending the size of the treehouse. Each has square platform and ladder access. 40. Two Tree Rectangular Treehouse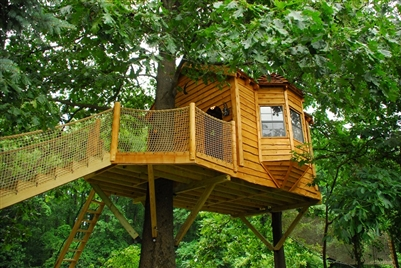
This two treehouse plan gives elaborate information on how to build a treehouse on two trees. The plan has 3D models of each phase which will make your job much easier. As far as the design is concerned, you get a big enough deck as well enough place for the house. 41. Ship In A Tree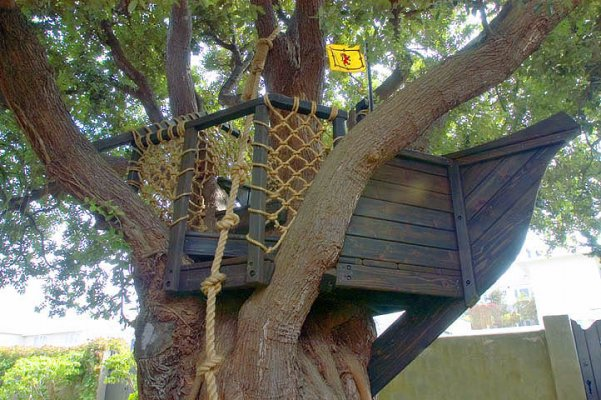
Your kids would love to be the sailor of this treehouse. It can be a good option if you want a simple treehouse deck where your kids can have fun. The design includes knotted rope. You can even add a climbing net if you want. 42. Wooded Treehouse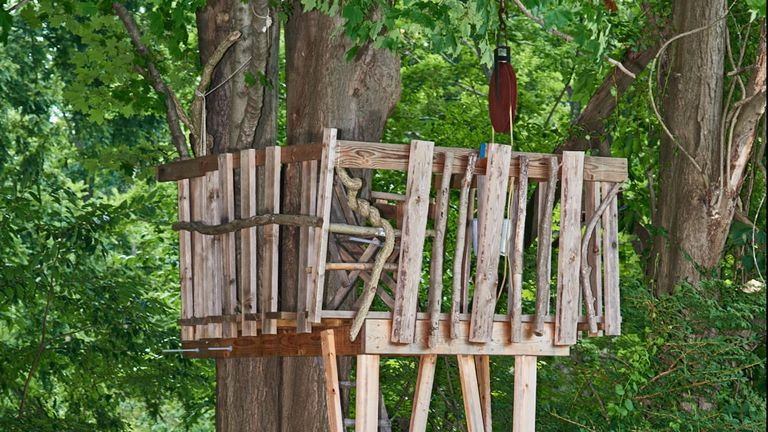
If you want to involve your kids in a treehouse building activity. This one design is very easy for the kids. You can also reuse some scrap wood pieces as it does not require a lot of standard material. 43. The Handmade Hideway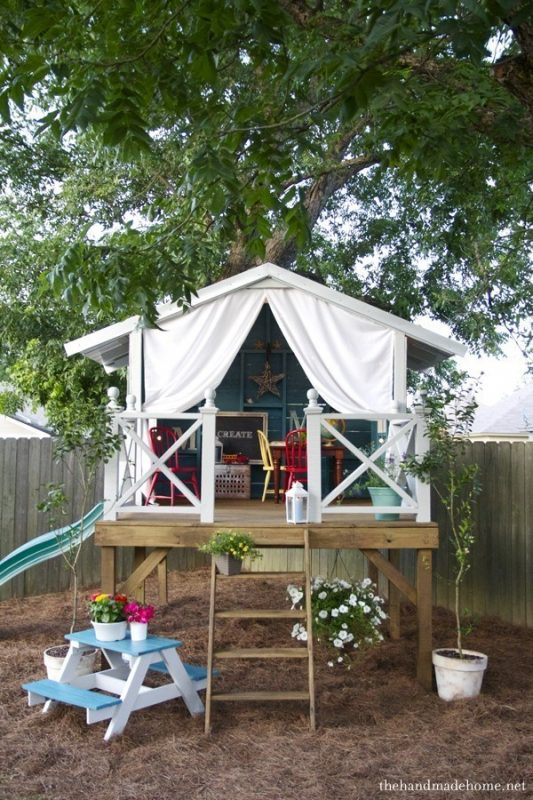
Just looking at the picture it feels like a treehouse from some architecture magazine. But if you look at the plans it seems very simple to make. Also, it doesn’t use any kind of tree for support. You can make it right under some tree. 44. Treehouse With Mesh Walls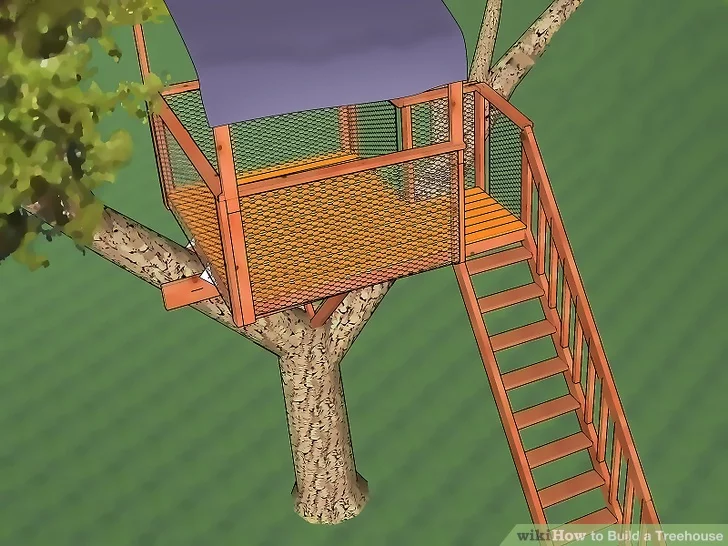
We found this tree house plans and design on a popular WikiHow website. It uses two V-branches of a tree. It doesn’t require a lot of material. Just a few pieces of wood for the platform and frames. Walls are made of mesh. You can use wood if you won’t break the winds. The roof uses tarp which is good if you want to plan to use treehouse during snow or rain. 45. A Unique Simple Treehouse 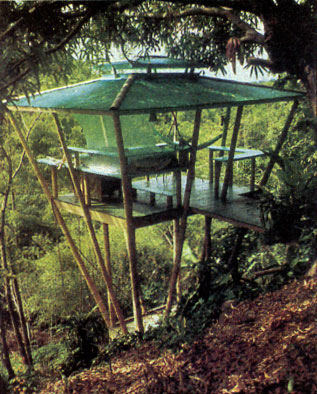
This another very unique design of the treehouse. Just look at the way roof and wood is being used. The plan is a little different than the picture but you can definitely take inspiration from the picture. 46. Log Lookout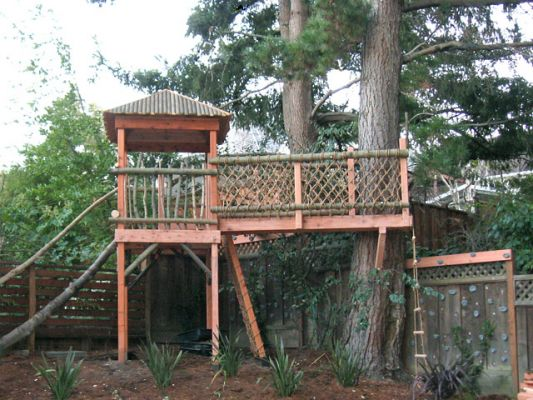
The designer has incorporated the lookout tower design in a treehouse. This type of design is really good for the kids. You can even add some fun accessories like zip line, climb net, disc swing. It uses some mix of bamboo to give it an Asian touch. 47. Magic Treehouse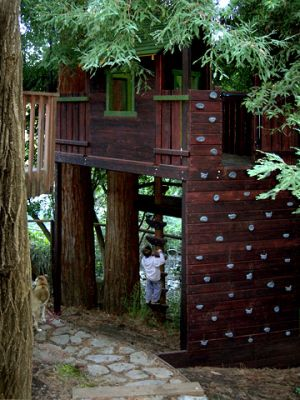
It definitely looks magical due to the use of redwood. Even the design of the house is such that it blends well with trees. If you are kids like to be close to nature, a design like this would be perfect. It also has a climbing wall, if you want to make your kids a little active. 48. Dynamite Treefort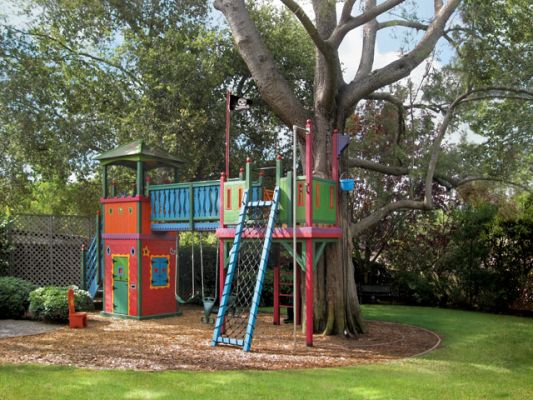
Most of us have dreamt of having a structure like this in our backyard. You cannot say it is a hundred percent treehouse but it does use some element of a treehouse with a tower structure. 49. Adorable Treehouse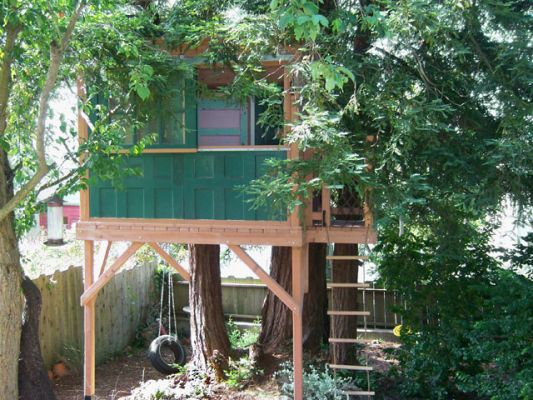
This adorable simple tiny treehouse could become a paradise for kids. Also, it is simple to make because it uses the most basic design. Also, it uses two-pole and a tree for support which is very safe. 50. Majestic Treehouse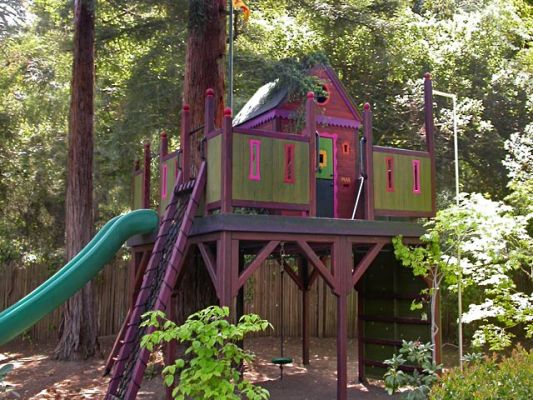
If you want to add a lot of accessories like slides, climbing nets, disc swings and many more, this could be a good design to consider. It also uses a single tree and poles for support. Final ThoughtWe have included a lot of designs from different sources. Some are free and some you will have to buy. Depending on the source, the way the plan is presented changes. You must take inspiration from different plans because each person has different requirements and conditions. source http://thehemloft.com/tree-house-plans-design/ Via https://thehemloft.tumblr.com/post/636284999722827776 Treehouses are one of the wildest fascinations on the planet. A vast majority of the people have dreamed of residing in one. With an outdoor faucet, it would be hard to resist. However, many of those treehouses are set in the middle of the forest or in the backyard exposed to rain and snow. Without proper waterproofing, your lucid dreams might turn to horrid nightmares. However, there is a systematic approach on how to waterproof treehouse. Keeping everything into account, we brought a wiser strategy, helping shield your house of dreams. Things You Would Need To Waterproof TreehouseFor a reliable treehouse, quality can’t be compromised. A proper selection of materials is a must. Without the necessary knowledge of these products, your treehouse might collapse. There are several products available online for waterproofing. However, not all are of top-notch quality. Easing your efforts, we bring you some of the best-selling waterproofing materials, reviewing them. 1. KILZ Exterior Siding, Fence, and Barn Paint, White
KILZ Exterior Siding, Fence, and Barn Paint
The waterproofing process must initiate with quality paint. Manufactured by Kilz, this is usually a barn and fence paint. Being oil-based, it will laminate the wood coating with a thick layer of titanium dioxide. This thick coating will extend the durability of the wood. You can use it on all wooden surfaces like roof-tops, walls, and the base. The paint thickens up in no time. Additionally, the product is manufactured to be more weather resistant. Due to this quality, it is favorable in all climate conditions. 2. Thomsons Water Seal Th.041851-16
THOMSONS WATER SEAL TH.041851-16
To take the waterproofing at the next level, this product was manufactured. Since 1920, Thomson’s water seal is dedicated to premium quality. With a tough resistance towards water damage, it has advanced polymers embedded in it. The coating will also resist mildew and UV radiations which are quite impressive for a water seal. With 5 unique colors, it can be applied to freshly cleaned damp and dry wood. With so much to offer, this product is best in the segment. So, how to waterproof your treehouse? Own this piece of legacy. 3. Heng’s Rubber Roof Coating
HENG’S RUBBER ROOF COATING
Manufactured by the tab grid, Heng’s Rubber Roof coating is the foremost choice of many furnishers. Mostly, it is used to seal vents. If you are planning to install an air-conditioner, this product is a must-have. With UV protection technology, this roof coating also resists cracks. It can also absorb tremendous impacts. So, during earthquakes, you’ll have nothing to worry about. Subjected to be more eco-friendly, the coating is non-toxic and non-polluting. With a “Go Green” motive, it reigns in its segment. 4. Achin Floor Furnishing
Sale

ACHIN FLOOR FURNISHING
The Achin Furnishing company is one of the best manufacturers in this segment. With an innovative sense of approach, the company developed the self-adhesive vinyl planks. Since treehouses are inspired by nature, these planks look like natural wood. It comes in boxes where there are 40 planks in each box. Each plank has a thickness of 2mm that will make the furnishing more durable. Coming to the size, each plank has a dimension of 6”×36”. This means that a box of these will cover a vast area of 60 sq. feet. You can also adjust their size by trimming as per your requirement. Never laminate these planks on an unclean and uneven surface, as it leads to wear and tear of the material. 5. Raw Linseed Oil
RAW LINSEED OIL
Raw linseed oil is the best natural alternative to waterproof wood. With variations in each product, choosing the perfect one is complex. To save you from contaminated products, we have Sunnyside corporation’s raw linseed oil. It penetrates deep into layers of wood, adding a quality finish. The originality of the product is confirmed, as it takes up to 2 days to dry completely. With weather resistant qualities, you have no choice but to purchase it. The oil is derived from the seeds of the Flax plant with 0% additives. You can use this oil to polish the outer wooden walls of your treehouse. So, without any haste, own it now 6. Sandpapers
SANDPAPERS
A fine polish before waterproofing is what you can’t ignore. It eradicates the uneven coarse of wood, making it more even. To make this happen, you must have the right kind of sandpapers. Low-quality sandpaper can deteriorate the quality of the wood. The Miyadi Sandpapers are worth buying in this category. Each pack comes with 32 sandpapers with 120-3000 grits. The sandpapers are made waterproof with silicon carbide. Forged through electrolysis, the carbides are distributed homogeneously. You can also polish both dry and wet wooden surfaces. Having a dimension of 9”×3.6”, the sandpapers can be trimmed. So, these sandpapers are worth to be on the list. How To Waterproof Treehouse?Furnishing works are quite systematic. The outcome of your efforts entirely depends on your systematical approach. Without proper methods, your entire efforts will go in vain. It will lead to an incomplete treehouse, leaving you dissatisfied. From sandpaper polishing to applying paint, every aspect needs supervision. To make the facts simpler, we dissected the entire process into phases. From the ladder to the floor, we describe every domain in detail. So, let’s start. 1. Preparation phaseThis phase is valid for all new and old treehouses. Since, the entire frame is made of wood, polishing is a must. To polish a new treehouse, select sandpaper of 120 or 220 grit. Otherwise, you may use sandpaper of 360 – 600 grits for non-new treehouses. Initiate the process by polishing the ladders. Rub with a mild force by covering all areas. Don’t miss out on the steps. As you move further up, polish the outer walls. It may take immense effort, but it’s worth it. After you’ve finished polishing the outdoors, move in. It is very important to polish the door frames of the washroom. If possible, try to cover each plank of wood by rubbing hard. It is recommended to use a specific 600 grit sandpaper. Since the bathroom is more associated with water, you’ll need to put an extra effort. After you’ve completed, sweep the floor to remove the uncertainties. With all polishing, you are done with the preparation phase. 2. Applying Waterproof SolutionsAfter a fine polish, it’s now time to complete the main work. Step 1 As mentioned above, the waterproofing process starts with quality paint. This is when the Valspar 1341-75 comes into use. Take a good quality brush and your color of choice. You can add some amount of turpentine and agitate the solution. Turpentine is a great organic solvent that will increase the volume of the paint. However, you must take care of the ratio of 1:5. Start painting from the ladders. Remember, that you must only paint the side rails. Leave the foot pecks for another arrangement. As you reach further up, complete painting the outdoor walls. On completion, move in. Similarly, paint the indoor walls for a cent percent waterproofing. After you’ve painted every wall, window, and door, it’s time to wait. Usually, the Valspar dries up in no time. But, taking humidity into account, wait for 24 hours. This will give you an idea on how to waterproof treehouse. Step 2 Waited for 24 hours? If yes, now get back to work again. Take an empty bucket with a minimum volume of 10 liters. Now, carefully pour the raw linseed oil into it. However, you can also add turpentine in the ratio of 1:5. It can be easily found at a nearby hardware store or a paint shop. Adding the necessary amount of turpentine will form an additional water-resistant coating. As usual, start from the ladders. Since ladders are more exposed to the outer environment, it needs extra care. Take a microfiber cloth and dip into the linseed solution partially. It would be excellent if you put on a leather glove. Start rubbing gently with an elongated reach. Never apply on the same surface over and over again. Doing this will be a total wastage of time and energy, as you’ve to cover a larger area. Also, remember not to apply the oil solution on the foot pecks. For we have a different arrangement for that domain. Similarly, proceed the same by covering the exterior and interior walls of your treehouse, leaving the floors. Step 3 After long anticipation of 3 days, your treehouse is 70% waterproof. Now, it’s time to cover up the floor. Unbox the box full of surprises. The Achin waterproof floor planks are to be spent now. At first, take the dimensions of the floor in each room with a measuring tape. As mentioned above, each box will cover a vast area of 60 sq. feet. Start your work from the verandah. On doing this, you’ll have a rough estimate to do the math. Lay each lamina carefully with precision. We would advise you to take the help of a companion if possible. Since, the layers can be trimmed, cut with precision. Working slowly, complete every room while leaving the bathroom. After completion, open the bottle of Thomson’s water seal. The application process is similar to that of paint. Pour the sealant into a small bucket. Then, take a high-quality brush and dip it in the solution. After agitation, apply the solution on the bathroom floor with an elongated reach. However, you only have to wait for 6 hours to let the sealant dry. Step 4 Now, you’re one step away from completing your project. Guess the area left out? Yes, it’s the room. The roofs are the most widely exposed domains in the entire design. Due to exposure to sunlight and rainfall, it has to be weather-persistent. Roofs need extra maintenance when they’re wooden. To prepare your roofs, we bring the concept of double-layering. First, apply the Thomson’s waterproof seal on the polished surface. The application must be similar as mentioned above. After drying up, it’s time to apply the Heng’s rubber roof coating. Manage to get on top of the roof with the all-new Heng’s rubber roof coating pack. Also, take a clean paint roller to avoid any accident. Besides, you’ll also have to cover a wider area. Dip the paint roller in the bucket full of rubber coating. Then, with proper strokes, paint all wooden planks of the roof. We advise you to apply the coating 3 times with intervals of 30 minutes. The moment you finish the last stroke, you’re all done. Major Areas Of A Treehouse That Needs WaterproofingAreas that are exposed to the outer environment need extra maintenance. The major areas of a treehouse that needs waterproofing are:
Why Do You Need To Waterproof Treehouse?Your house of dreams is threatened by external factors. In the case of a treehouse, sunlight, and water the primary threats. However, water causes harm to your treehouse more rapidly. The main reason behind the waterproofing of a treehouse is to ensure safety. In the absence of waterproof coatings, the wood will rot faster than you imagine. Failing you bear the weight of you and your belongings, it will collapse. It can cause heavy injury or even death. Besides, decaying woods will encourage the growth of worms. In no time, you’ll place will lose its hygiene. Therefore, we advise you to waterproof your treehouse as soon as possible. In brief, here are some ill-effects without a proper waterproofing:
Final ThoughtWith such care, we placed before you the detailed answer to your question on how to waterproof treehouse. Take the effort to check the condition of your treehouse every 6 months. Also, it is important to choose the perfect tree to build your house. Building a treehouse on an under-nourished tree may result in casualties. Therefore, before building a treehouse, remember these key points. source http://thehemloft.com/how-to-waterproof-treehouse/ Via https://thehemloft.tumblr.com/post/636284998914342912 |

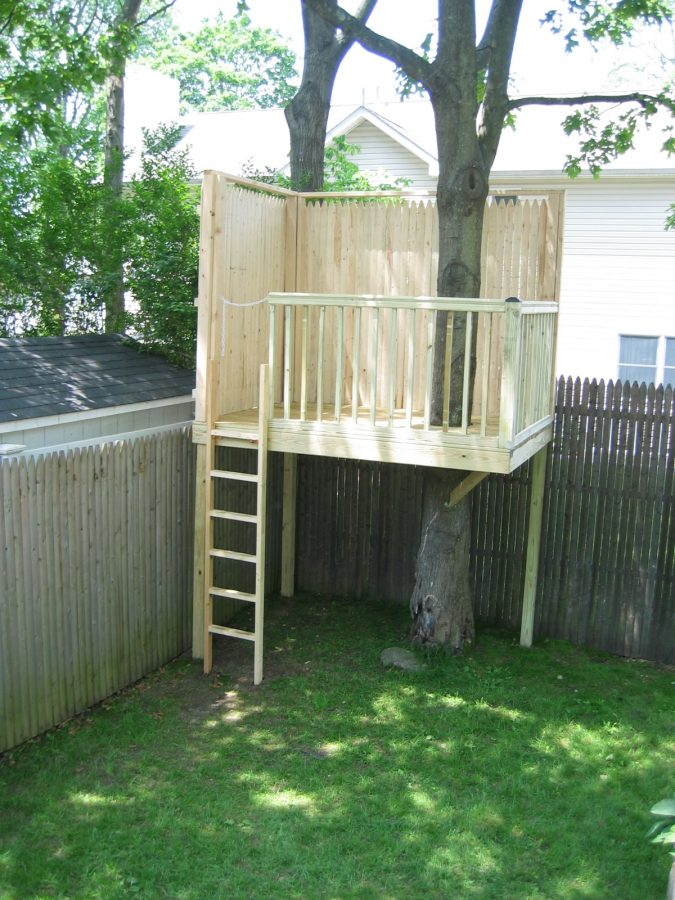
 RSS Feed
